Introduction
In this post, I'm going to create a multi-Master Galera cluster of MariaDBs, a robust, scalable, and reliable drop-in replacement for MySQL, to work in a highly available environment on Azure Virtual Machines.
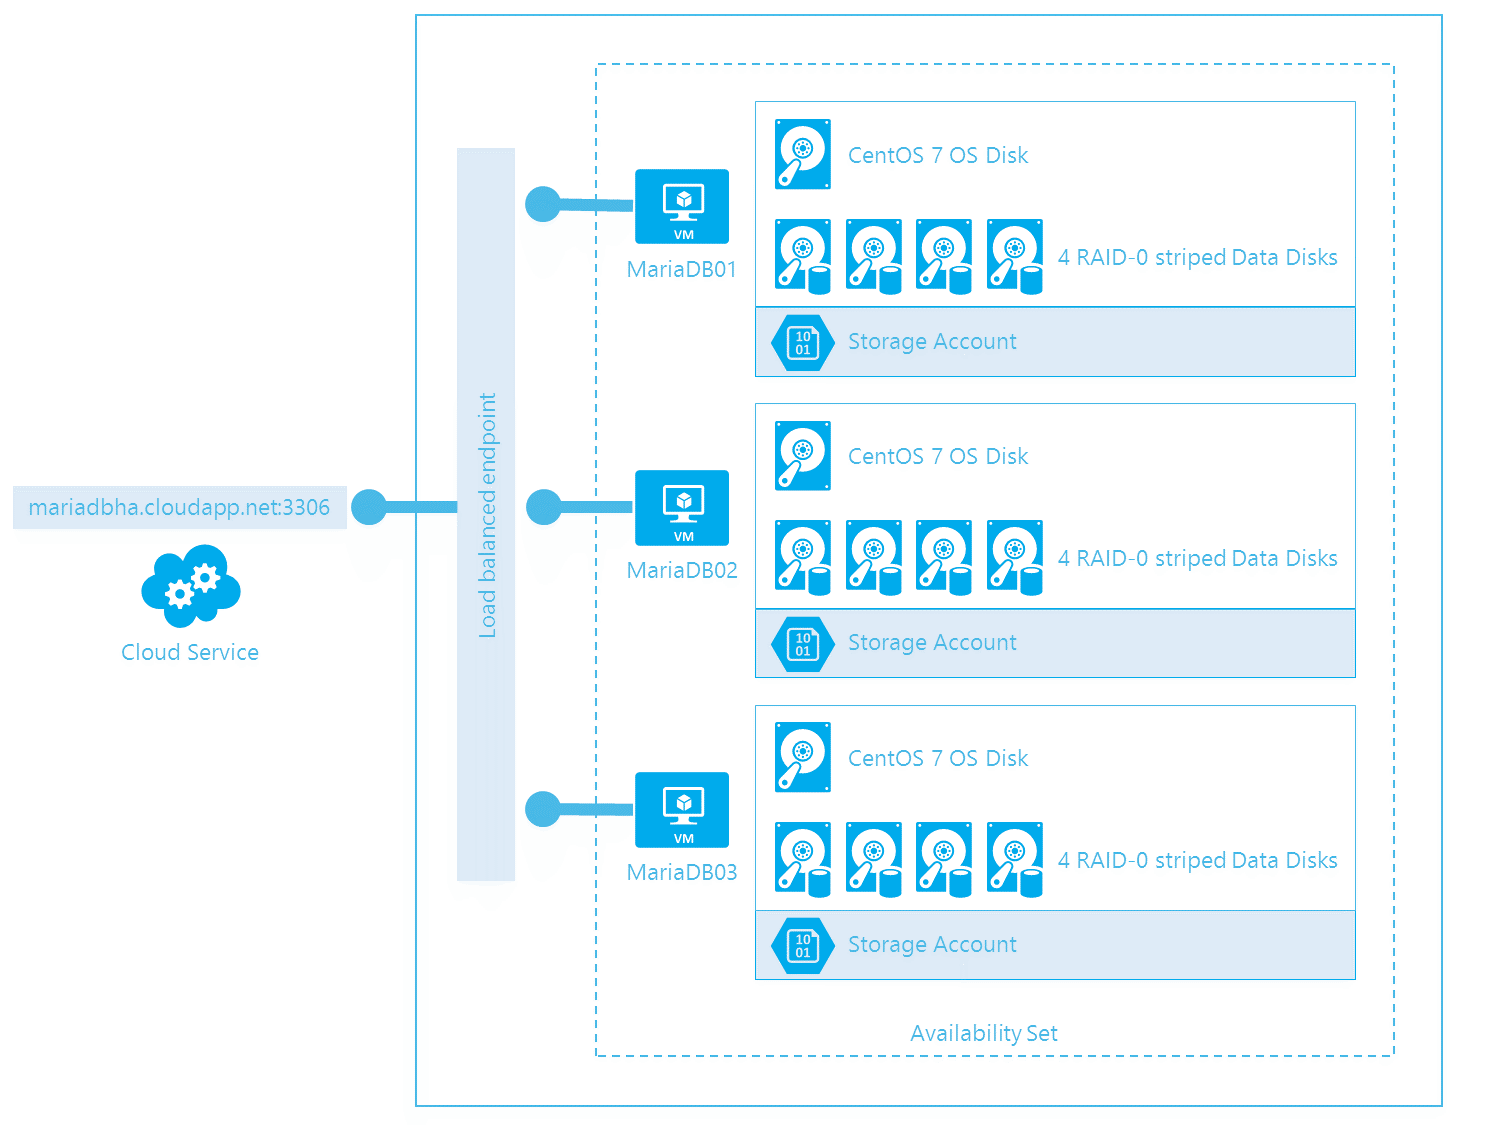
Architecture overview
Below is what we are ulitmatley want to achieve. Key points being:
- 3 node cluster to ensure we don't have split brain
- Separate Data Disks from the OS Disk
- Create the Data Disks in RAID-0/striped setting to increase IOPS
- The 3 nodes are load balanced using the Azure Load Balancer
- I want to minimize repetetive work, so I'll create a VM image containing MariaDB+Galera and use it to create the other cluster VMs.
Let's go
I'm going to do things a bit differently this time. Instead of working with the Azure Portal GUI, I'm going to try and do as much of the repetitive work as possible using the Azure CLI tools, so make sure to download them and follow the connecting them to your Azure subscription instructions.
If you need a reference to the commands available in the Azure CLI, check out this link for the Azure CLI command reference. You will also need to create an SSH key for authentication and make note of the .pem file location.
Create the template
-
Create an Affinity Group to hold our resources together
azure account affinity-group create mariadbcluster --location "North Europe" --label "MariaDB Cluster" -
Create a Virtual Network
azure network vnet create --address-space 10.0.0.0 --cidr 8 --subnet-name mariadb --subnet-start-ip 10.0.0.0 --subnet-cidr 24 --affinity-group mariadbcluster mariadbvnet -
Create a Storage Account to host all our disks. Note that according to the documentation, you shouldn't be placing more than 40 heavily used disks on the same Storage Account to avoid hitting the 20,000 IOPS Storage Account limit. In our case, we're far off from this number so I'll opt for storing everyhing on the same account for simplicity
azure storage account create mariadbstorage --label mariadbstorage --affinity-group mariadbcluster -
Find the name of the CentOS 7 Virtual Machine image
azure vm image list | findstr CentOS
this will output something like 5112500ae3b842c8b9c604889f8753c3__OpenLogic-CentOS-70-20140926. Use the name in the following step.
-
Create the VM template replacing /path/to/key.pem with the path where you stored the generated .pem SSH key
azure vm create --virtual-network-name mariadbvnet --subnet-names mariadb --blob-url "http://mariadbstorage.blob.core.windows.net/vhds/mariadbhatemplate-os.vhd" --vm-size Medium --ssh 22 --ssh-cert "/path/to/key.pem" --no-ssh-password mariadbtemplate 5112500ae3b842c8b9c604889f8753c3__OpenLogic-CentOS-70-20140926 azureuser -
Attach 4 x 500GB data disks to the VM for use in the RAID configuration
FOR /L %d IN (1,1,4) DO azure vm disk attach-new mariadbhatemplate 512 http://mariadbstorage.blob.core.windows.net/vhds/mariadbhatemplate-data-%d.vhd -
SSH into the template VM that you created at mariadbhatemplate.cloudapp.net:22 and connect using your private key.
-
Install required software by changing to root
sudo suthen-
Install RAID support:
-
Install mdadm
yum install mdadm -
Create the RAID0/stripe configuration with an EXT4 file system
mdadm --create --verbose /dev/md0 --level=stripe --raid-devices=4 /dev/sdc /dev/sdd /dev/sde /dev/sdf mdadm --detail --scan >> /etc/mdadm.conf mkfs -t ext4 /dev/md0 -
Create the mount point directory
mkdir /mnt/data -
Retrieve the UUID of the newly created RAID device
blkid | grep /dev/md0 -
Edit /etc/fstab
vi /etc/fstab -
Add the device in there to enable auto mouting on reboot replacing the UUID with the value obtained from the blkid command before
UUID=<UUID FROM PREVIOUS> /mnt/data ext4 defaults,noatime 1 2 -
Mount the new partition
mount /mnt/data
-
-
Add MariaDB repos by:
-
Creating the MariaDB.repo file:
vi /etc/yum.repos.d/MariaDB.repo -
Filling it with the below content
  [mariadb]
  name = MariaDB
  baseurl = http://yum.mariadb.org/10.0/centos7-amd64
  gpgkey=https://yum.mariadb.org/RPM-GPG-KEY-MariaDB
  gpgcheck=1
-
-
Remove existing postfix and mariadb-libs to avoid conflicts
yum remove postfix mariadb-libs-* -
Install MariaDB with Galera
yum install MariaDB-Galera-server MariaDB-client galera -
Set permissions accordingly
chown -R mysql:mysql /mnt/data && chmod -R 755 /mnt/data/ -
Copy the current MySQL directory into its new location and remove the old directory
cp -avr /var/lib/mysql /mnt/data rm -rf /var/lib/mysql -
Create a symlink pointing the old directory to the new location on the RAID partition
ln -s /mnt/data/mysql /var/lib/mysql -
SELinux will interfere with the cluster operations, so until it is made compatible, it is necessary to disable it for the current session theb edit
/etc/selinux/configto disable it for subsequent restartssetenforce 0then editing
/etc/selinux/configto setSELINUX=permissive -
Start MySQL
service mysql start -
Secure the MySQL installation, set the root password, remove anonymous users, disabling remote root login and removing the test database
mysql_secure_installation -
Create a user on the database for cluster operations and optionally, your applications
mysql -u root -p GRANT ALL PRIVILEGES ON *.* TO 'cluster'@'%' IDENTIFIED BY 'p@ssw0rd' WITH GRANT OPTION; FLUSH PRIVILEGES; exit -
Stop MySQL
service mysql stop -
Edit the MySQL configuration to create a placeholder for the cluster settings. Do not replace the
<Vairables>or uncomment now. We'll do it once we create a VM from this template.vi /etc/my.cnf.d/server.cnf -
Edit the [galera] section and clear it out
-
Edit the [mariadb] section
   wsrep_provider=/usr/lib64/galera/libgalera_smm.so
   binlog_format=ROW
   wsrep_sst_method=rsync
   bind-address=0.0.0.0 # When set to 0.0.0.0, the server listens to remote connections
   default_storage_engine=InnoDB
   innodb_autoinc_lock_mode=2
   wsrep_sst_auth=cluster:p@ssw0rd # CHANGE: Set the username and password you created for the SST cluster MySQL user
   #wsrep_cluster_name='mariadbcluster' # CHANGE: Uncomment and set your desired cluster name
   #wsrep_cluster_address="gcomm://mariadb1,mariadb2,mariadb3" # CHANGE: Uncomment and Add all your servers
   #wsrep_node_address='<ServerIP>' # CHANGE: Uncomment and set IP address of this server
   #wsrep_node_name='<NodeName>' # CHANGE: Uncomment and set the node name of this server
-
-
Open required ports on the firewall (using FirewallD on CentOS 7)
- MySQL:
firewall-cmd --zone=public --add-port=3306/tcp --permanent - GALERA:
firewall-cmd --zone=public --add-port=4567/tcp --permanent - GALERA IST:
firewall-cmd --zone=public --add-port=4568/tcp --permanent - RSYNC:
firewall-cmd --zone=public --add-port=4444/tcp --permanent
Reload the firewall:
firewall-cmd --reload - MySQL:
-
Optimize the system for performance
-
Increase the maximum number of system handles for high concurrency by adding editing /etc/security/limits.conf file
vi /etc/security/limits.conf -
And adding the following four lines to increase the maximum allowed concurrent handles. Note that 65536 is the maximum number that the system can support
* soft nofile 65536 * hard nofile 65536 * soft nproc 65536 * hard nproc 65536 -
Updating the system for the new limits
ulimit -SHn 65536 ulimit -SHu 65536 -
Ensure that the limits are updated at boot time
echo "ulimit -SHn 65536" >>/etc/rc.local echo "ulimit -SHu 65536" >>/etc/rc.local chmod +x /etc/rc.d/rc.local -
You can use the same performance tuning strategy to configure MySQL on Azure as on an on-premises machine. The main I/O optimization rules are increasing the cache size and reducing the I/O response time. Optimize MySQL settings by editing the configuration
vi /etc/my.cnf.d/server.cnf -
Edit the [mariadb] section and append the below. Take note of the innodb_buffer_pool_size to be 70% of your VM's memory. I've set it at 2.45GB for the Medium Azure VM with 3.5GB of RAM.
   innodb_buffer_pool_size = 2508M # The buffer pool contains buffered data and the index. This is usually set to 70% of physical memory.
   innodb_log_file_size = 512M #  Redo logs ensure that write operations are fast, reliable, and recoverable after a crash
   max_connections = 5000 # A larger value will give the server more time to recycle idled connections
   innodb_file_per_table = 1 # Speed up the table space transmission and optimize the debris management performance
   innodb_log_buffer_size = 128M # The log buffer allows transactions to run without having to flush the log to disk before the transactions commit
   innodb_flush_log_at_trx_commit = 2 # The setting of 2 enables the most data integrity and is suitable for Master in MySQL cluster
   query_cache_size = 0
-
-
Stop MySQL and Deprovision the machine and disable MySQL service from running on startup to avoid messing up the cluster when adding a new node
service mysql stop chkconfig mysql off waagent -deprovision -
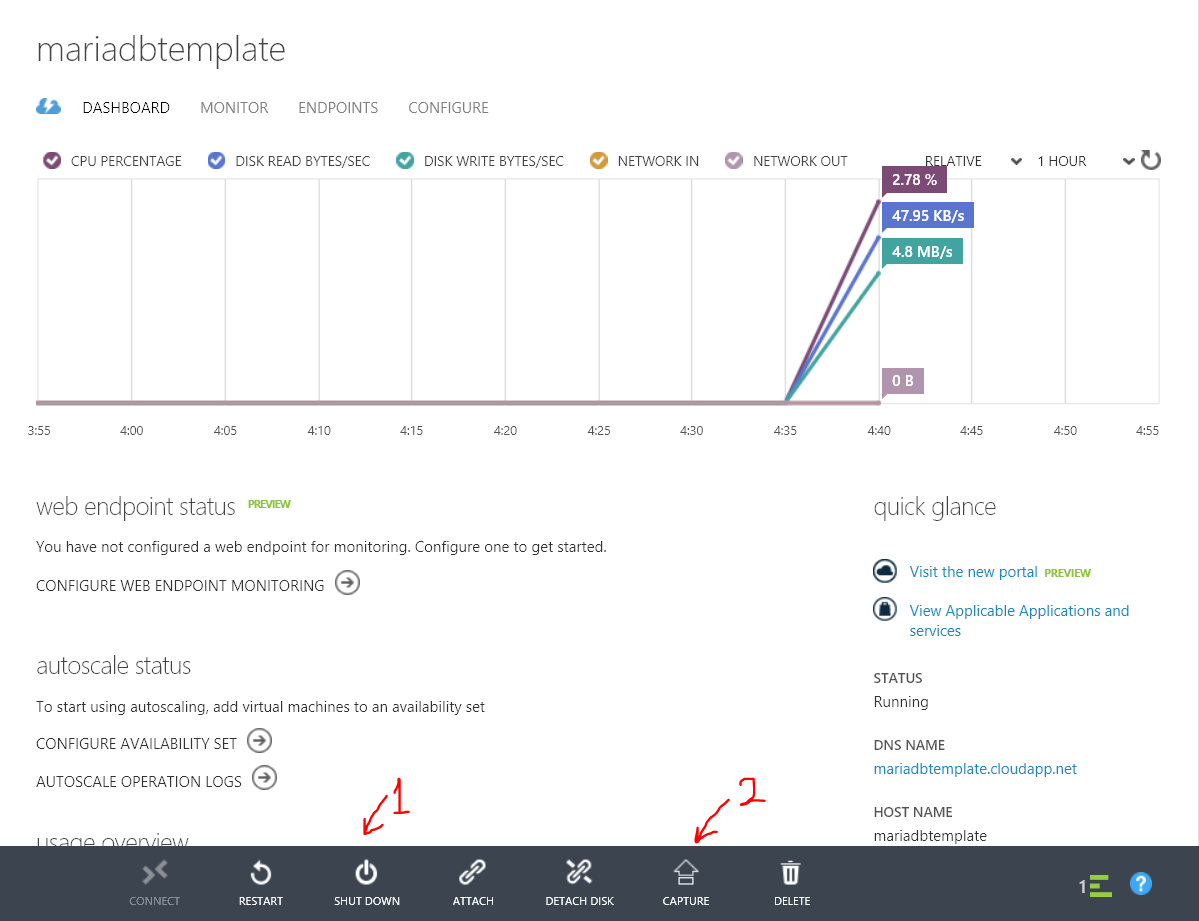
Capture the VM. Now for this specific step, I'll do it through the portal because there is an open issue in the Azure CLI tools now that leads to images captured not capturing the attatched data disks.
- Shutdown the machine through the portal
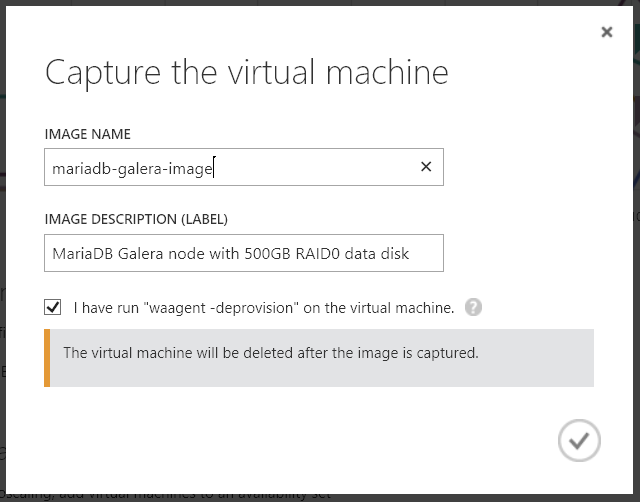
- Click on Capture and specify the image name as mariadb-galera-image and provide a description and check "I have run waagent".
Create the cluster
Now that we've created the template with MariaDB installed and optimized, we'll create 3 VMs out of this template then configure and start the cluster.
-
Create the first CentOS 7 VM from the mariadb-galera-image image, providing the virtual network name you created mariadbvnet and the subnet mariadb, machine size Medium, passing in the Cloud Service name to be mariadbha (or whatever name you want to be accessed through mariadbha.cloudapp.net), setting the name of this machine to be mariadb1 and the username to be azureuser, and enabling SSH access and passing the SSH certificate .pem file and replacing /path/to/key.pem with the path where you stored the generated .pem SSH key.
I've split the command over multiple lines for clarity, but you should enter it as one line.
azure vm create --virtual-network-name mariadbvnet --subnet-names mariadb --availability-set clusteravset --vm-size Medium --ssh-cert "/path/to/key.pem" --no-ssh-password --ssh 22 --vm-name mariadb1 mariadbha mariadb-galera-image azureuser -
Create 2 more Virtual Machines by connecting them to the currently created mariadbha Cloud Service, changing the VM name as well as the SSH port to a unique port not conflicting with other VMs in the same Cloud Service.
 azure vm create
 --virtual-network-name mariadbvnet
 --subnet-names mariadb
 --availability-set clusteravset
 --vm-size Medium
 --ssh-cert "/path/to/key.pem"
 --no-ssh-password
 --ssh 23
 --vm-name mariadb2
 --connect mariadbha mariadb-galera-image azureuser
and for MariaDB3
	azure vm create
    --virtual-network-name mariadbvnet
    --subnet-names mariadb
    --availability-set clusteravset
	--vm-size Medium
	--ssh-cert "/path/to/key.pem"
	--no-ssh-password
	--ssh 24
	--vm-name mariadb3
    --connect mariadbha mariadb-galera-image azureuser
-
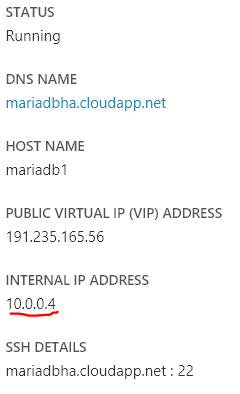
You will need to get the internal IP address of each of the 3 VMs for the next step:
-
SSH into the 3 VMs and and edit the configuration file on each
sudo vi /etc/my.cnf.d/server.cnfuncommenting
wsrep_cluster_nameandwsrep_cluster_addressby removing the # at the beginning and validation they are indeed what you want.
Additionally, replace<ServerIP>inwsrep_node_addressand<NodeName>inwsrep_node_namewith the VM's IP address and name respectively and uncomment those lines as well. -
Start the cluster on MariaDB1 and let it run at startup
sudo service mysql bootstrap chkconfig mysql on -
Start MySQL on MariaDB2 and MariaDB3 and let it run at startup
 sudo service mysql start
 chkconfig mysql on
Loadbalance the cluster
When we created the clustered VMs, we already added them into an Availablity Set called clusteravset to ensure they are put on different fault and update domains and that Azure never does maintenance on all machines at once. Doing so will also give us the SLA.
Now we need to load balance requests between our 3 nodes, and for that we will use the built-in Azure Loadbalancer.
Run the below commands on your machine using the Azure CLI. The command parameters mean
azure vm endpoint create-multiple <MachineName> <PublicPort>:<VMPort>:<Protocol>:<EnableDirectServerReturn>:<Load Balanced Set Name>:<ProbeProtocol>:<ProbePort>
azure vm endpoint create-multiple mariadb1 3306:3306:tcp:false:MySQL:tcp:3306
azure vm endpoint create-multiple mariadb2 3306:3306:tcp:false:MySQL:tcp:3306
azure vm endpoint create-multiple mariadb3 3306:3306:tcp:false:MySQL:tcp:3306
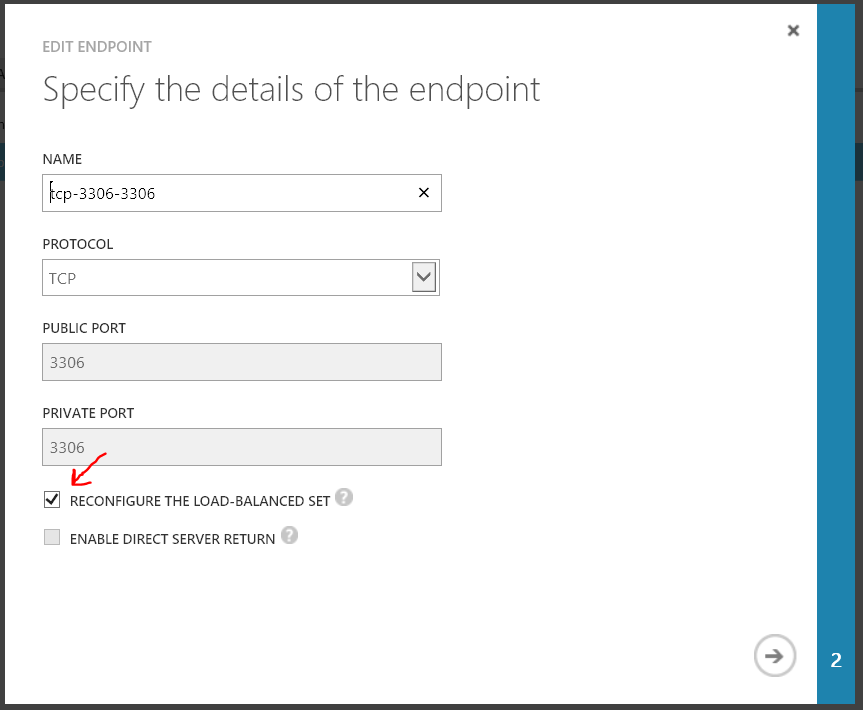
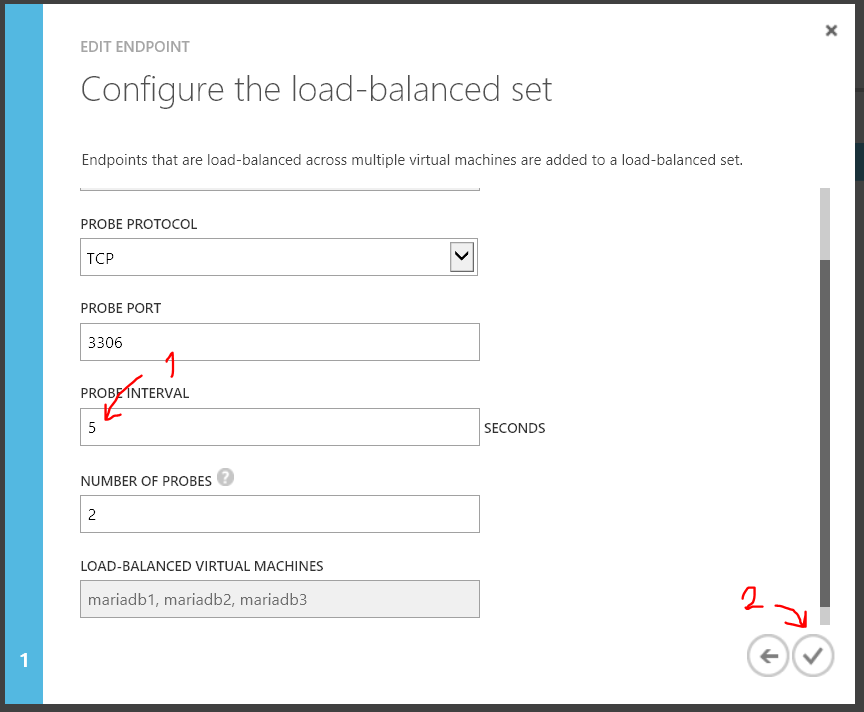
Finally, since unfortunately the CLI sets the probe interval to 15 seconds which is a bit too long, we have to change it on the portal under Endpoints for any of the VMs
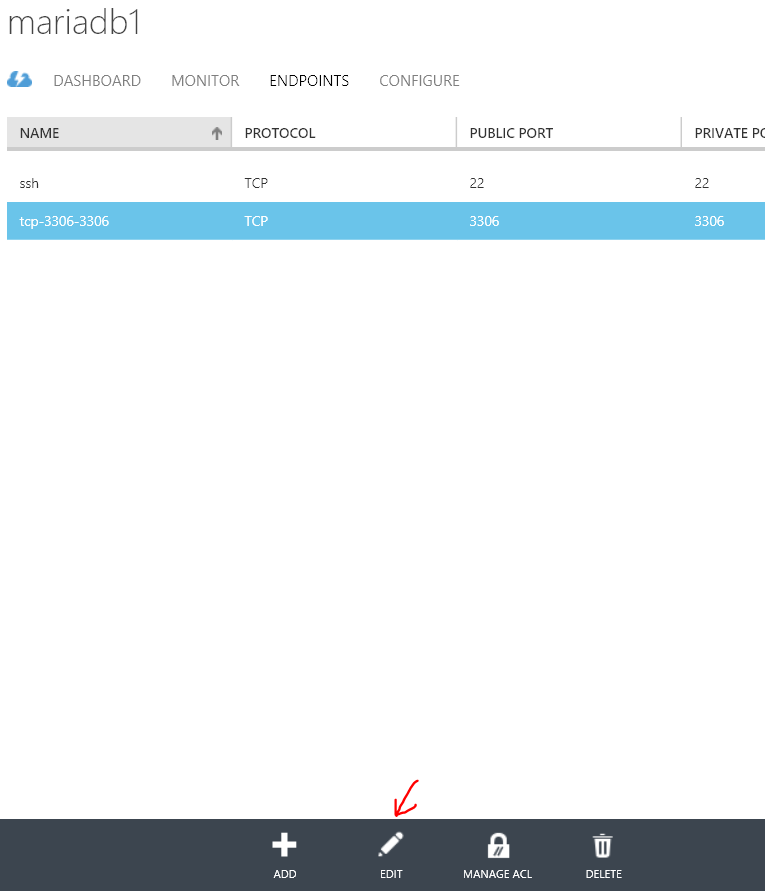
then click on Reconfigure The Load-Balanced Set and go next
then change the Probe Interval to 5 seconds and save
Validating the cluster
We're done with the hardwork. Our cluster should be now accessible at mariadbha.cloudapp.net:3306 which will hit the load balancer and route requests between out 3 VMs.
Use your favorite MySQL client to connect (I'll just connect from one of the VMs)
mysql -u cluster -h mariadbha.cloudapp.net -p
Then create a new database and populate it with some data
CREATE DATABASE TestDB;
USE TestDB;
CREATE TABLE TestTable (id INT NOT NULL AUTO_INCREMENT PRIMARY KEY, value VARCHAR(255));
INSERT INTO TestTable (value)  VALUES ('Value1');
INSERT INTO TestTable (value)  VALUES ('Value2');
SELECT * FROM TestTable;
Will result in the table below
+----+--------+
| id | value  |
+----+--------+
|  1 | Value1 |
|  4 | Value2 |
+----+--------+
2 rows in set (0.00 sec)
Closing
In this article, we've created a 3 node MySQL Galera highly available cluster on Azure Virtual Machines running CentOS 7. The machines are load balanced with the Azure Load Balancer.
In a future article, I will run benchmarks against the cluster and present the results.