Introduction
In this post, I'll be creating an application that registers for monitoring a specific hashtag on twitter for new tweets. When there is a batch of new tweets, the application will be notified via a Push notification. I'll be using Windows Azure Mobile Services. If you didn't know, you can create up to 10 Mobile Services on Azure for free. So I recommend you go ahead and sign up right now!
For this post, I'll be creating it as a Windows 8 app, but you can do the exact same thing on Windows Phone 8, iOS and Android as well.
Let's start!
First, we create a new Mobile Service on Azure.

Then we need to register the newly created Mobile Service for push notifications using the Windows Notification Service (since we are developing a Windows 8 app). To do that, submit your app to the Windows Store. You must then configure your mobile service to integrate with WNS.
If you have not already registered your app, navigate to the Submit an app page at the Dev Center for Windows Store apps, log on with your Microsoft account, and then click App name.

Type a name for your app in App name, click Reserve app name, and then click Save.

Go to Advanced features.

In the Advanced Features page, click Push notifications and Live Connect services info, then click Authenticating your service.

Make a note of the values of Client secret and Package security identifier (SID).

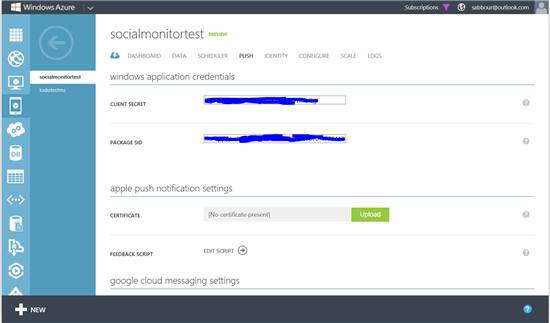
Go back to the Mobile Service management portal, click on "PUSH", then enter the Client Secret and Package SID
The backend
Now we've configured the push notification integration, let's create a table to save the tags we want to be monitoring. Go to the "DATA" tab, click on Create, then name your table "Tag".

Now you have the basics ready, let's go on with the Windows 8 app.
The app
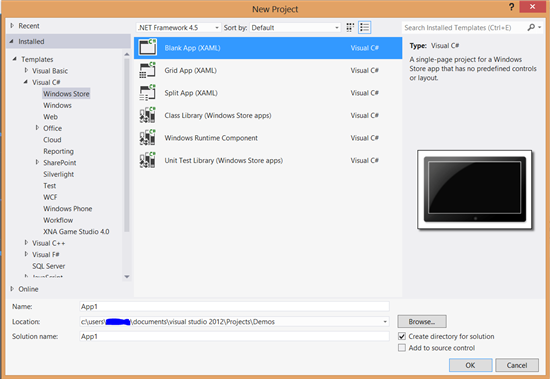
Open up Visual Studio and create a new Windows Store blank application.
Now create a new Tag.cs class as a datastructure to store in our Table on the Mobile Service
 public class Tag
 {
 public int Id { get; set; }
 public string Hashtag { get; set; } // hashtag to monitor
 public string Channel { get; set; } // channel to push on, will fill later
 public int MaxId { get; set; } // last tweet we've seen on this tag
 }
Now we need to connect this app to the Mobile Service we created. If you haven't installed the the Mobile Services SDK, install it. In your Visual Studio project, add a reference to the "Windows Azure Mobile Services Client" extension.
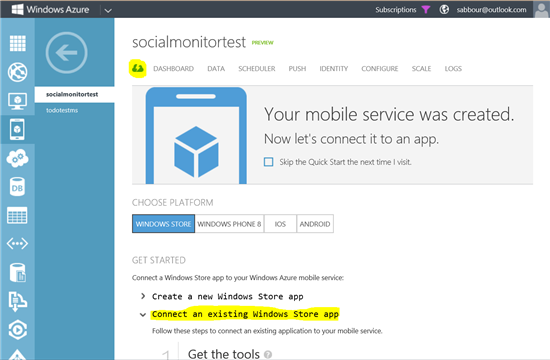
Go back to the Mobile Service dashboard, and click on "Connect an existing Windows Store app"
then Copy and Past the code snippet you find there into the top of as a field App.xaml.cs
public static MobileServiceClient MobileService = new MobileServiceClient(
 "https://socialmonitortest.azure-mobile.net/",
 "aRandomKeySecretForYourApp"
 );
What this snippet does is that it provides you with an object that you can use to query your Mobile Service.
Now, to be able to use push notifications, the app first has to obtain a "channel" from the Windows Notification Service, then pass this channel to the Mobile Services so that Azure knows which device to push this notification to. This is very easy as well, just put the following code snippet just below the one to initialize the Mobile Service.
 // Define a variable to store the channel
 public static PushNotificationChannel CurrentChannel { get; set; }

 // When called, this method will obtain a channel and update the variable
 private async void AcquirePushChannel()
 {
 CurrentChannel = await PushNotificationChannelManager.CreatePushNotificationChannelForApplicationAsync();
 }
Then call the AcquirePushChannel()method in the OnLaunched()of App.xaml.cs which will get a channel for you.
Update the app manifest to enable "Toast Capable", so that you can receive the notifications.

Add a text box and a button to your app, and wire to the Clicked event handler of the button to store the hashtag, the push channel in the Mobile Service
 private async void monitorButton_Click(object sender, RoutedEventArgs e)
 {
 var tag = new Tag {Hashtag = hashtagTextBox.Text, Channel = App.CurrentChannel.Uri};
 await App.MobileService.GetTable<Tag>().InsertAsync(tag);
 }
Now, your app will store hashtags to be monitored into the Mobile Service
The scheduler
Now the app is ready, and the backend is ready, all what is left is to code the scheduler, which is also a part of Mobile Services to regularly query twitter for tweets on all the monitored hashtags, and push notifications to the registered channels.
Go to the "SCHEDULER" tab and create a new Schedule

In the script, enter the below code
function HashtagMonitor() {
 var request = require('request');
 var tagsTable = tables.getTable('tag');

 tagsTable.read({
 success: function(results) {
 results.forEach(
 function(tag) {
 var url = "http://search.twitter.com/search.json?q="+encodeURIComponent(tag.Hashtag)

 // If we have retrieved tweets before, only return tweets later than those
 if(tag.MaxId>0)
 url += "&since_id="+tag.MaxId;

 request(url,
 function(err, response, body) {
 var json = JSON.parse(body);

 // Store the max_id in the tag row
 // so that next time, we only return tweets more recent than this one
 updateMaxId(tag.id,json.max_id);

 // Get the number of results
 // If greater than zero, push a notification
 var resultCount = json.results.length;
 if(resultCount>0)
 sendPushNotification(tag.Channel, tag.Hashtag, resultCount, json.results[0].profile_image_url);
 });
 }
 )
 }
 });
 }

 function updateMaxId(tagId, sinceId) {
 var tagsTable = tables.getTable('tag');
 tagsTable.where({ id: tagId }).read({
 success: function(items) {
 var item = items[0];
 item.MaxId = sinceId;
 tagsTable.update(item);
 }
 });
 }

 function sendPushNotification(channel,hashtag,count,imageUrl) {
 var bigImageUrl = imageUrl.replace("_normal","");
 // Toast
 push.wns.sendToastImageAndText01(channel, {
 text1: "There are " + count + " new tweets on " + hashtag,
 image1src: bigImageUrl,
 image1alt: "profile"
 });
 }
What this code does is that it queries our Tag table for entries, then for each row, it fires an HTTP request to the twitter API http://search.twitter.com/search.json?q="+encodeURIComponent(tag.Hashtag) then parses the resulting JSON to extract the number of tweets, the profile picture of the latest tweeter and also the ID of the last tweet.
If there are new tweets (determined by the ID of the latest tweet), then a push notification is pushed to the channel that was stored in the Tag by the client, by calling the push.wns.sendToastImageAndText01() method. And because we configured Windows Notification Service in the Mobile Service configuration, that's all what it takes to push!

Note: This post originally appeared on my MSDN blog at http://blogs.msdn.com/b/africaapps/archive/2013/03/12/creating-hashtag-monitor-app-a-application-using-windows-azure-mobile-services.aspx