Introduction
Achieving High Availability on your database level is essential in order to maintain your application availability. On Azure, you can provision a managed highly-available MySQL database cluster through a 3rd party ClearDB.
In this post, I'm going to explore creating a highly available and scalable MySQL environment using Master-Master replication and the Azure Load Balancer.
Setting up Master-Master replication
MySQL replication is the process by which data stored in a MySQL database, is continuously copied to a second server, called "Master-Slave" replication. On the other hand, what we will be exploring here is "Master-Master" replication, where data is bi-directionally copied between two servers. This allows us to perform reads or writes from either server, ensuring high availability and scalability.
Step 1 - Setting up the infrastructure
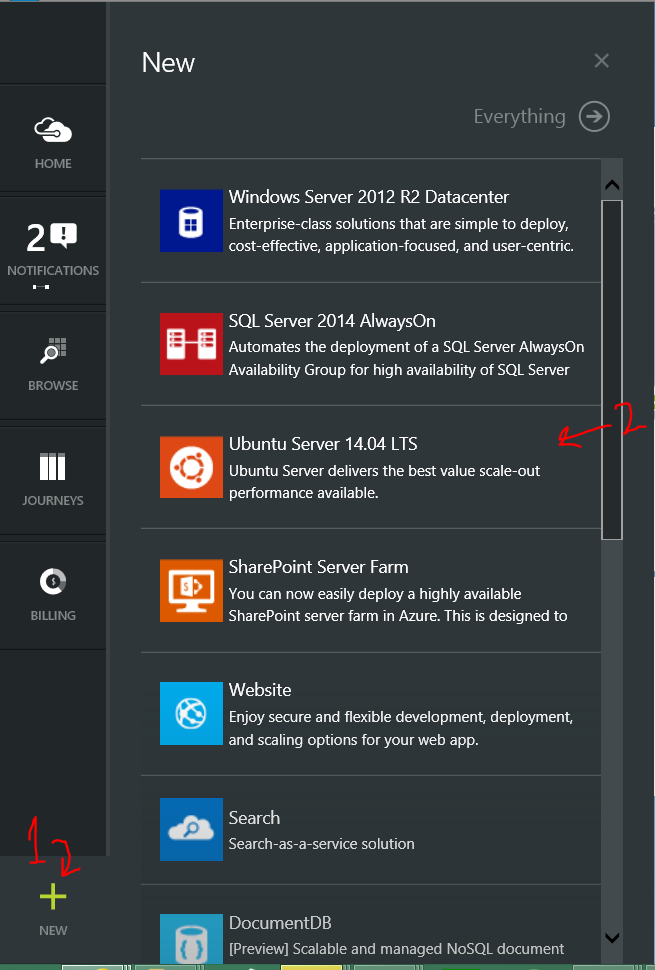
Login to the new Azure Portal and click on New, then choose Ubuntu 14.04 LTS to start.
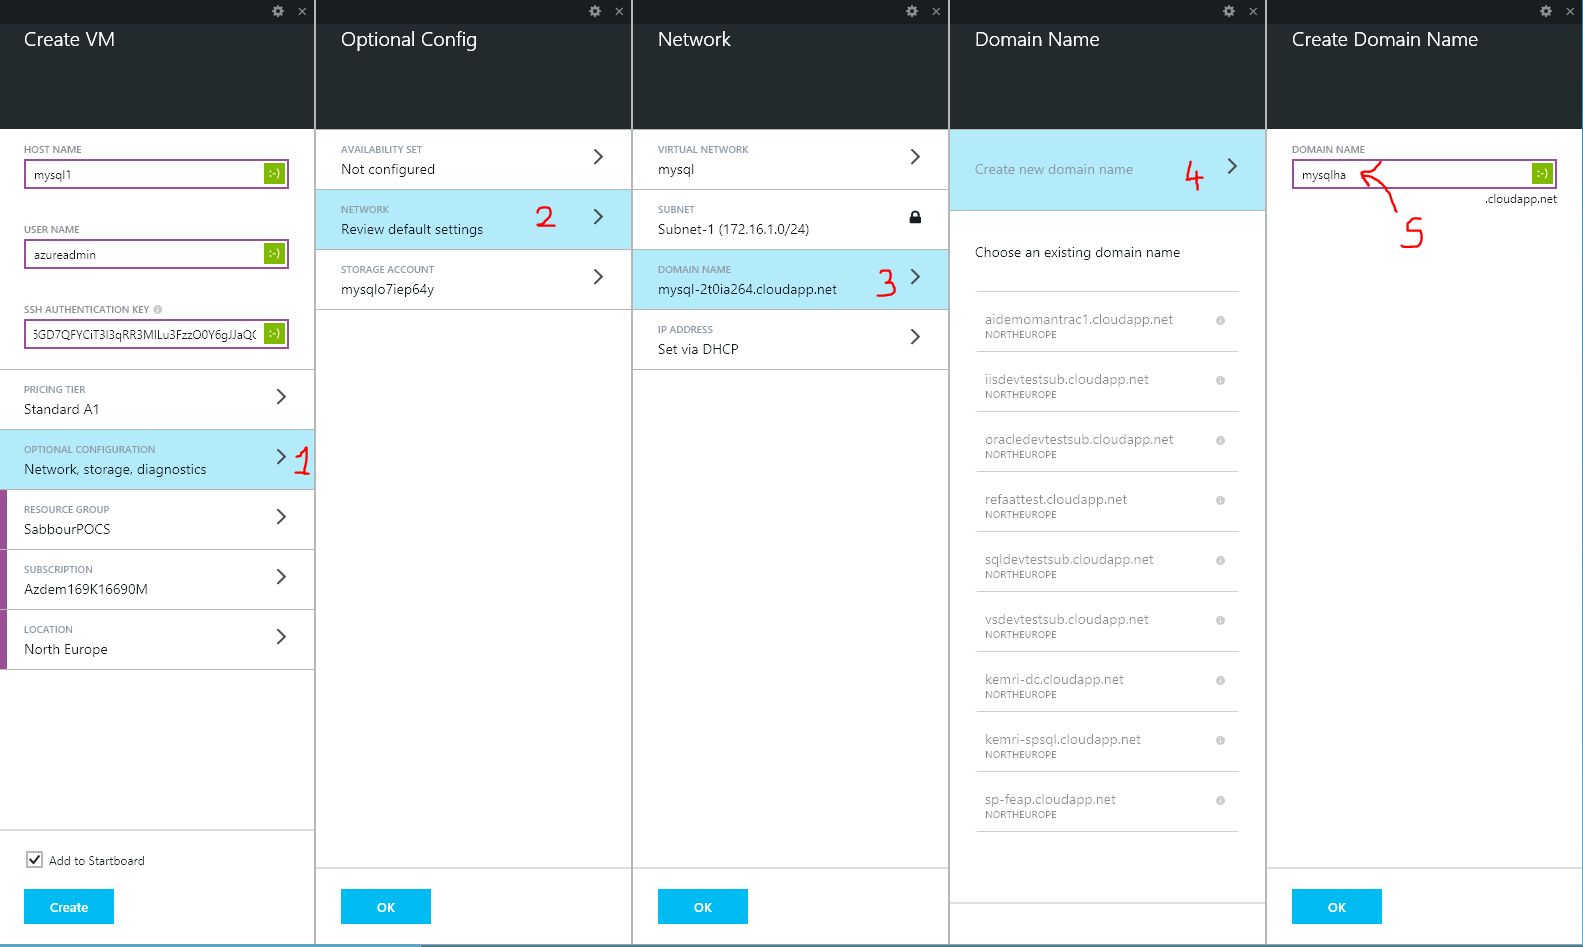
Now fill in the data require. In my setup I've used mysql1 as the hostname of this first machine, and I've customized the Cloud Service name to be mysqlha.
Additionally, you'll need to provide an SSH key for logging in to the machines with certificates, so here is how to generate an SSH key for Azure if you haven't already.
Additionally, we will need to manually assign a static IP address (instead of relying on DHCP) to ensure that even if we stop or restart a machine, it will come up with the same address.
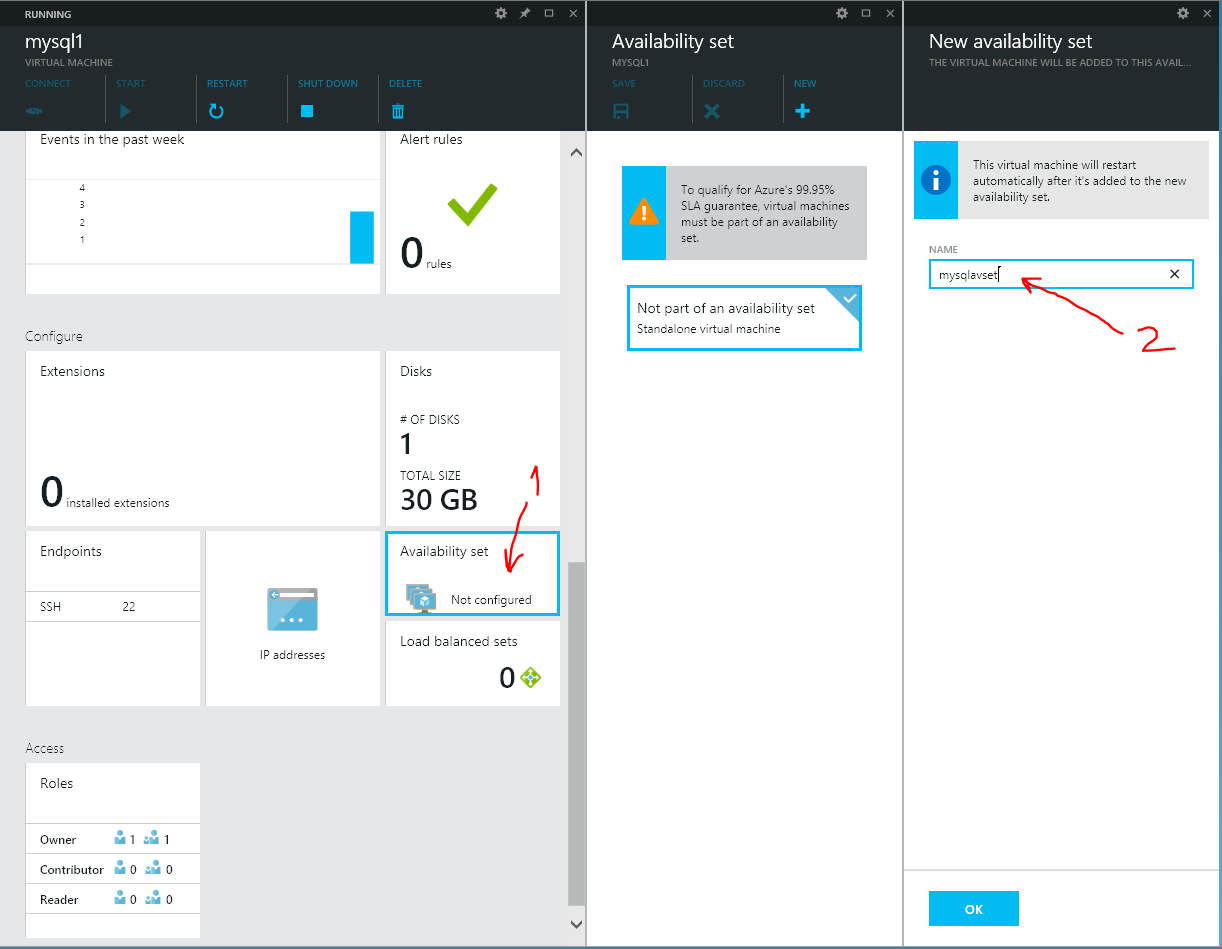
Once the machine has been created, we need to add it to an Availability Set
Now, let's add a second Virtual Machine to the same Cloud Service and availablity set by going to the Resource Group, and adding a new resource (Virtual Machine), specifying the hostname to be mysql2 and the same user name and SSH key.
What is important to notice is, when creating this second Virtual Machine, you have to add it to the same Availability Set of the first mysql1 machine. You might also want to use the same Storage Account.
Make sure you configure a different Static IP.
Now let the portal create the second Virtual Machine.
Step 2 - Installing MySQL
Once both machines are up and running, we'll need to SSH into each machine and run a few commands to install MySQL and setup the replication.
The SSH endpoint on both machines would be your Cloud Service name, in my case here that would be mysqlha.cloudapp.net and the port would be the one defined in the Endpoints. For mysql1 that would be port 22, for mysql2 that would be 50793 which was randomly assigned by the portal.
Using your favorite SSH client, SSH into your machines one by one to setup.
Virtual Machine: mysql1
Install MySQL
Once you're connected, update the package sources
sudo apt-get update
Then let's install mysql-server and mysql-client packages
sudo apt-get install mysql-server mysql-client
Create replication user
Create the replication user and specify a password
create user 'replicator'@'%' identified by 'aComplexPassword';
Then give him permissions to replicate all databases (that are specified in the config file)
grant replication slave, replication client on *.* to 'replicator'@'%';
Then run flush privileges; to apply changes to the user table.
After this step is completed, you should be able to login to mysql1 from mysql2 through the replicator user.
Configure replication
We need to edit and set some parameters in MySQL configuration to ensure correct replication. Open the config file using your favorite editor bysudo nano /etc/mysql/my.cnf
- Uncomment and edit the
server-idspecifying a non zero identifier that will identify the server in the replication group. - Uncomment
log_bin = /var/log/mysql/mysql-bin.logwhich is the path where the transactions are stored. - Uncomment and edit
binlog_do_db = exampledbwith the name of the database(s) you wish to include in the replication relationship. - Comment
bind-address = 127.0.0.1to allow connections from the Internet. In a production environment, you probably don't want to do this and you can opt to use Azure Internal Loadbalancer and make the service only accessible from within your Virtual Network. - Set the
relay-log,relay-log-indexandrelay-log-info-fileto ensure proper resumption of replication relationship in the event of MySQL service restart or failover:
relay-log = /var/log/mysql/relay-bin
relay-log-index = /var/log/mysql/relay-bin.index
relay-log-info-file = /var/log/mysql/relay-bin.info
- To avoid auto incremented primary keys from clashing across servers, you also need to set on
mysql1and change the increment offset onmysql2
auto_increment_increment = 2
auto_increment_offset    = 1
- Finally also set
log_slave_updates = 1to ensure that changes that happened on the other master are also reflected in this machine's binary log.
To summarize, here are the final list of changes and variables under [mysqld]:
#bind-address = 127.0.0.1
server-id = 1
log_bin = /var/log/mysql/mysql-bin.log
binlog_do_db = exampledb # your database name here
relay-log = /var/log/mysql/relay-bin
relay-log-index = /var/log/mysql/relay-bin.index
relay-log-info-file = /var/log/mysql/relay-bin.info
auto_increment_increment = 2
auto_increment_offset    = 1
log_slave_updates		 = 1
Ctrl-X then Y to save and exit.
Restart mysql sudo service mysql restart
Finally, we need 2 pieces of information to setup the replication on the slave mysql2, we can obtain them through show master status; which will output something similar to:
+------------------+----------+--------------+------------------+
| File             | Position | Binlog_Do_DB | Binlog_Ignore_DB |
+------------------+----------+--------------+------------------+
| mysql-bin.000001 |      343 | exampledb    |                  |
+------------------+----------+--------------+------------------+
1 row in set (0.00 sec)
The information we need is the File and Position. Make note of them, they are probably different on your server than from what you see here.
Virtual Machine: mysql2
For our second MySQL node, mysql2, we'll configure it using the exact same steps as we've did for mysql1 (install MySQL, add replication user and configure) with the exception to setting the server-id = 2 and auto_increment_offset = 2 in the /etc/mysql/my.cnf config file.
Step 3 - Setup replication between mysql1 and mysql2
Create the database on mysql1
On mysql1, in a MySQL prompt, create the exampledb
create database exampledb;
Point the slave mysql2 to master mysql1
On mysql2, in this step, we will need:
- The replicator user credentials
- The master log File name (of
mysql1) that we obtained previously throughshow master status;onmysql1 - The Position (of
mysql1) that we obtained previously throughshow master status;onmysql1
Then run the below on the MySQL prompt replacing the values with your values:
slave stop;
CHANGE MASTER TO MASTER_HOST = 'mysql1', MASTER_USER = 'replicator', MASTER_PASSWORD = 'aComplexPassword', MASTER_LOG_FILE = 'mysql-bin.000001',  MASTER_LOG_POS = 344;
Start replication
After doing the above, start the slave on mysql2 then show the status of the replication relationship
slave start;
show slave status;
Test mysql1 to mysql2 replication
On mysql1, create a new table on the exampledb
create table exampledb.dummy(id INT NOT NULL AUTO_INCREMENT PRIMARY KEY, data varchar(100)); then insert a couple of rows
insert into exampledb.dummy SET data='mysql 1 to 2 replication test';
insert into exampledb.dummy SET data='mysql 1 to 2 replication test another row';
Once you do that and do a select * from exampledb.dummy on mysql2 you should find the rows nicely waiting for you:
mysql> select * from exampledb.dummy;
+----+-------------------------------------------+
| id | data                                      |
+----+-------------------------------------------+
|  1 | mysql 1 to 2 replication test             |
|  3 | mysql 1 to 2 replication test another row |
+----+-------------------------------------------+
2 rows in set (0.00 sec)
Step 4 - Setup replication between mysql2 and mysql1
Point the slave mysql1 to master mysql2
On mysql1, in this step, we will need:
- The replicator user credentials
- The master log File name (of
mysql2) that we obtained previously throughshow master status;onmysql2 - The Position (of
mysql2) that we obtained previously throughshow master status;onmysql2
Then run the below on the MySQL prompt replacing the values with your values:
slave stop;
CHANGE MASTER TO MASTER_HOST = 'mysql2', MASTER_USER = 'replicator', MASTER_PASSWORD = 'aComplexPassword', MASTER_LOG_FILE = 'mysql-bin.000003',  MASTER_LOG_POS = 107;
Start replication
After doing the above, start the slave on mysql1 then show the status of the replication relationship
slave start;
show slave status;
Test mysql2 to mysql1 replication
On mysql2, then insert a couple of rows
insert into exampledb.dummy SET data='mysql 2 to 1 replication test';
insert into exampledb.dummy SET data='mysql 2 to 1 replication test another row';
Once you do that and do a select * from exampledb.dummy on mysql1 you should find the rows nicely waiting for you:
mysql> select * from exampledb.dummy;
+----+-------------------------------------------+
| id | data                                      |
+----+-------------------------------------------+
|  1 | mysql 1 to 2 replication test             |
|  3 | mysql 1 to 2 replication test another row |
|  4 | mysql 2 to 1 replication test             |
|  6 | mysql 2 to 1 replication test another row |
+----+-------------------------------------------+
4 rows in set (0.00 sec)
Step 5 - Load balance between mysql1 and mysql2
Now that we have setup the Master-Master replication between mysql1 and mysql2, we need to ensure that applications using this database always find a healthy replica.
There are a couple of ways to do this, one of them being setting up another Virtual Machine running HAProxy for example or in our case, I'm going to make use of the Azure Load Balancer that comes with the Cloud Service to setup load balancing.
Note that in this setup, I'm going to expose my MySQL database to the internet over a public endpoint (3306), I could apply ACL to the endpoint to allow only specific IP addresses to connect, or I can make use of the Internal Azure Load balancer. For the purpose of this blog post, I'll just leave it public.
Create Load balanced set on mysql1
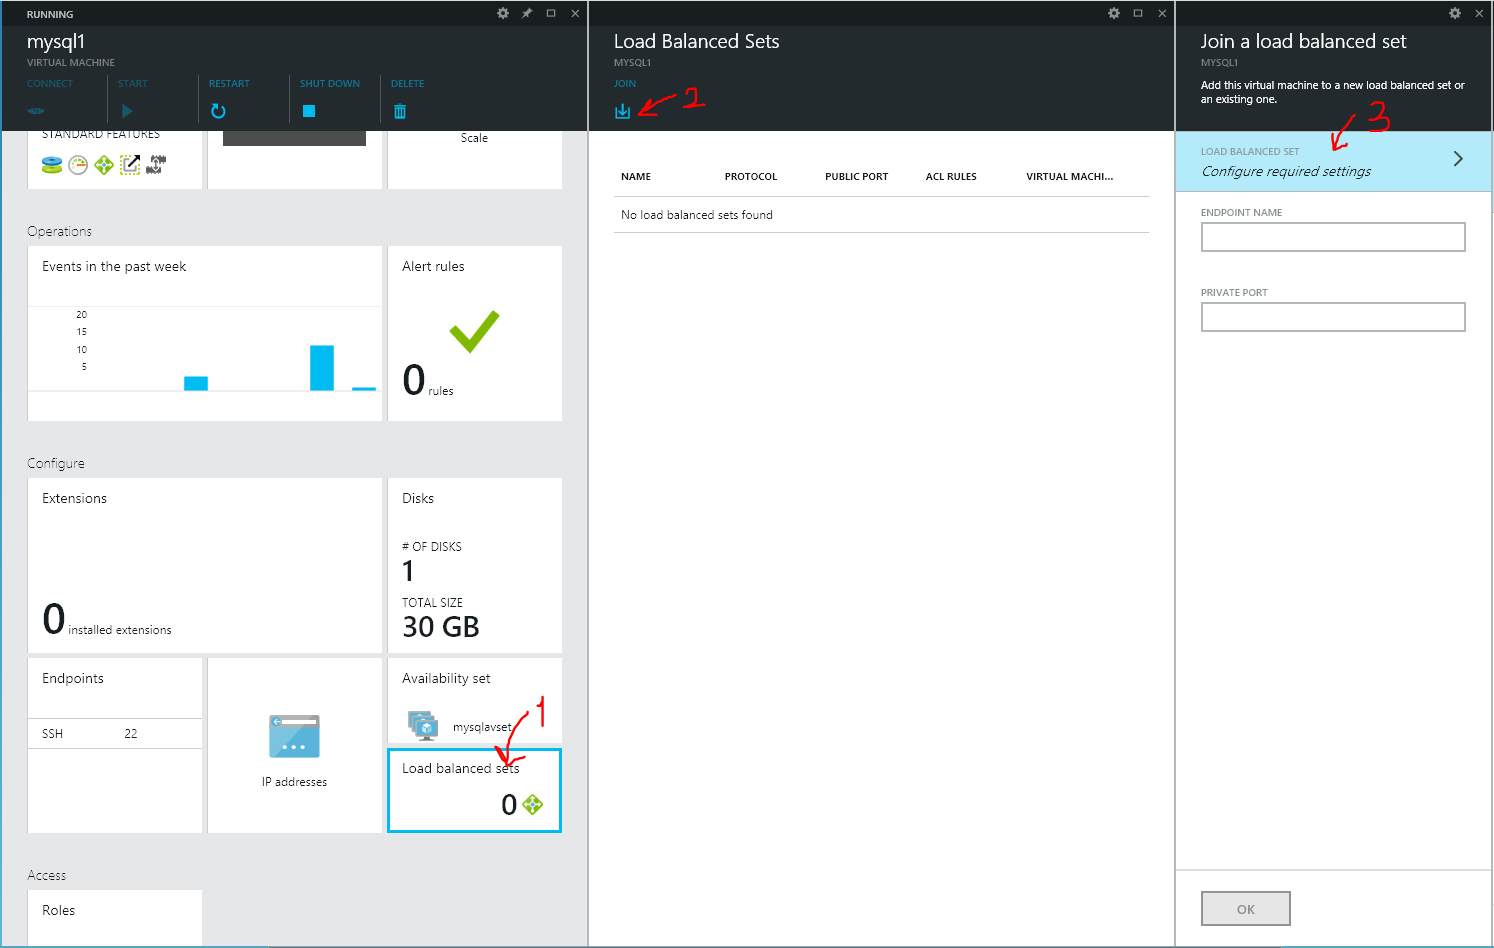
Let's go back to our portal, click on the mysql1 VM, scroll down to Load balanced sets and click there, then click on Join, then Configure required settings.
Then Create new with Public and Private ports 3306, specify a 6 second interval and 2 retries before considering node unavailable then save and wait for the set to show in the table.
Join the same Load balanced set on mysql2
Repeat the same procedure for mysql2 but instead of creating a new set, join the previously created one.
Step 6 - Test load balancing
Additionally, for the purpose of the blog post, on both servers, run:
grant all privileges on *.* to 'root'@'%' identified by 'aComplexPassword';
flush privileges;
which essentially allows the root user to connect remotely.
You should now be able to connect to your MySQL "farm" on
mysqlha.cloudapp.net:3306 so test it from any machine and do a show variables like "server_id" to get
+---------------+-------+
| Variable_name | Value |
+---------------+-------+
| server_id     | 2     |
+---------------+-------+
1 row in set (0.00 sec)
if you disconnect and connect again, you might get
+---------------+-------+
| Variable_name | Value |
+---------------+-------+
| server_id     | 1     |
+---------------+-------+
1 row in set (0.00 sec)
Step 6 - Test Fail over
Now Shutdown one of the VMs (for example mysql2) on Azure and try to connect to mysqlha.cloudapp.net and insert a couple of rows.
+---------------+-------+
| Variable_name | Value |
+---------------+-------+
| server_id     | 1     |
+---------------+-------+
1 row in set (0.00 sec)
mysql> insert into exampledb.dummy SET data='mysql 1 is up, testing failover';
Now Start the mysql2 VM again and directly connect to it's MySQL instance, then select * from exampledb.dummy. You should find the row inserted while the instance was offline synced:
+----+-------------------------------------------+
| id | data                                      |
+----+-------------------------------------------+
|  1 | mysql 1 to 2 replication test             |
|  3 | mysql 1 to 2 replication test another row |
|  4 | mysql 2 to 1 replication test             |
|  6 | mysql 2 to 1 replication test another row |
|  7 | Testing Load balancing                    |
|  8 | Testing Load balancing 2                  |
|  9 | mysql 1 is up, testing failover           |
+----+-------------------------------------------+
7 rows in set (0.00 sec)


