If you're doing Kubernetes, you should definitely be doing Continuous Integration and Continuous Deployment (CI/CD) and the tools to help you do so are a dime a dozen.
I work at Microsoft, so I obviously have some bias to our tools, but regardless, I find that Azure DevOps is actually a great suite of tools that you should certainly consider, and you know what, you can use it for free. So, in this post, I'm going to document how I would do a CI/CD pipeline using Azure DevOps, Azure Kubernetes Service and Azure Container Registry to build, package and deploy apps.
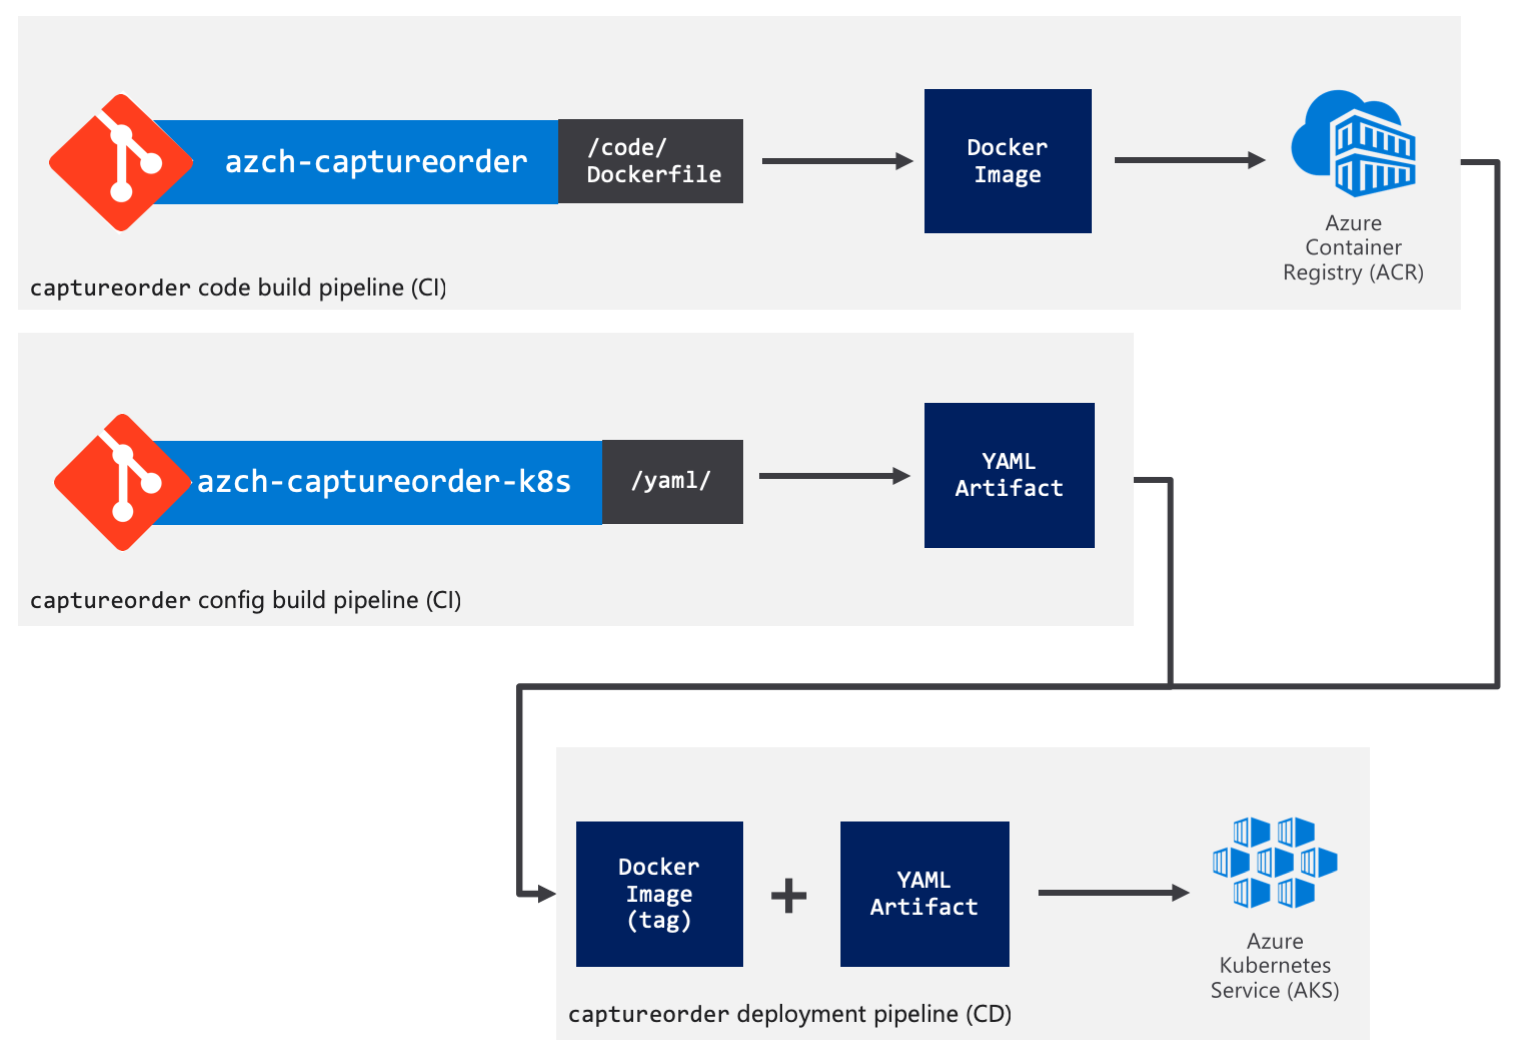
One repo, two repos?
There are multiple opinions on whether you should store code and configuration in the same repository, with everything that is needed to deploy a "service" in a single place, or if it would be better to split them up into two repositories.
In my approach, I chose the latter, that is splitting them up in two repositories for two main reasons:
- Seperation of concerns - the source code of the application doesn't need to know or be concerned with how it is deployed. You could be deploying it on Kubernetes using YAML files, using Helm charts, or using Terraform. It doesn't need to know and you can manage this separately.
- Having code and config in the same repository assumes that they are tightly coupled. If you changed the configuration of Kubernetes to add an ingress or increase the replica count, you would end up building a redundant Docker image and pushing that into your repository, unless you get fancy with path filters and your build system supports this.
Alright, let's get into the details. I'm going to be using Azure Pipelines (YAML) for the build pipelines. At the time of this writing, the release pipelines YAML support is on the roadmap, so I'll have to revert to using the graphical designer for that.
I'm also going to assume the code lives in a Git repo on Azure Repos but it doesn't have to be. Azure Pipelines can run builds on a variety of sources, including GitHub, BitBucket and others.
Application
The application is a microservice, written in Go with a Dockerfile to build the application into a container.
Code build pipeline
For the build pipeline, create an azure-pipelines.yml file in the repository with the content below.
The pipeline is really simple, it runs docker build and docker push.
pool:
  vmImage: 'Ubuntu 16.04'

variables:
  imageName: 'captureorder:$(Build.BuildId)'
  # define three more variables acrName, dockerId and dockerPassword in the build pipeline in UI

steps:
- script: docker build -f Dockerfile -t $(acrName).azurecr.io/$(imageName) .
  displayName: 'docker build'

- script: docker login -u $(dockerId) -p $(dockerPassword) $(acrName).azurecr.io
  displayName: 'docker login'

- script: docker push $(acrName).azurecr.io/$(imageName)
  displayName: 'docker push'
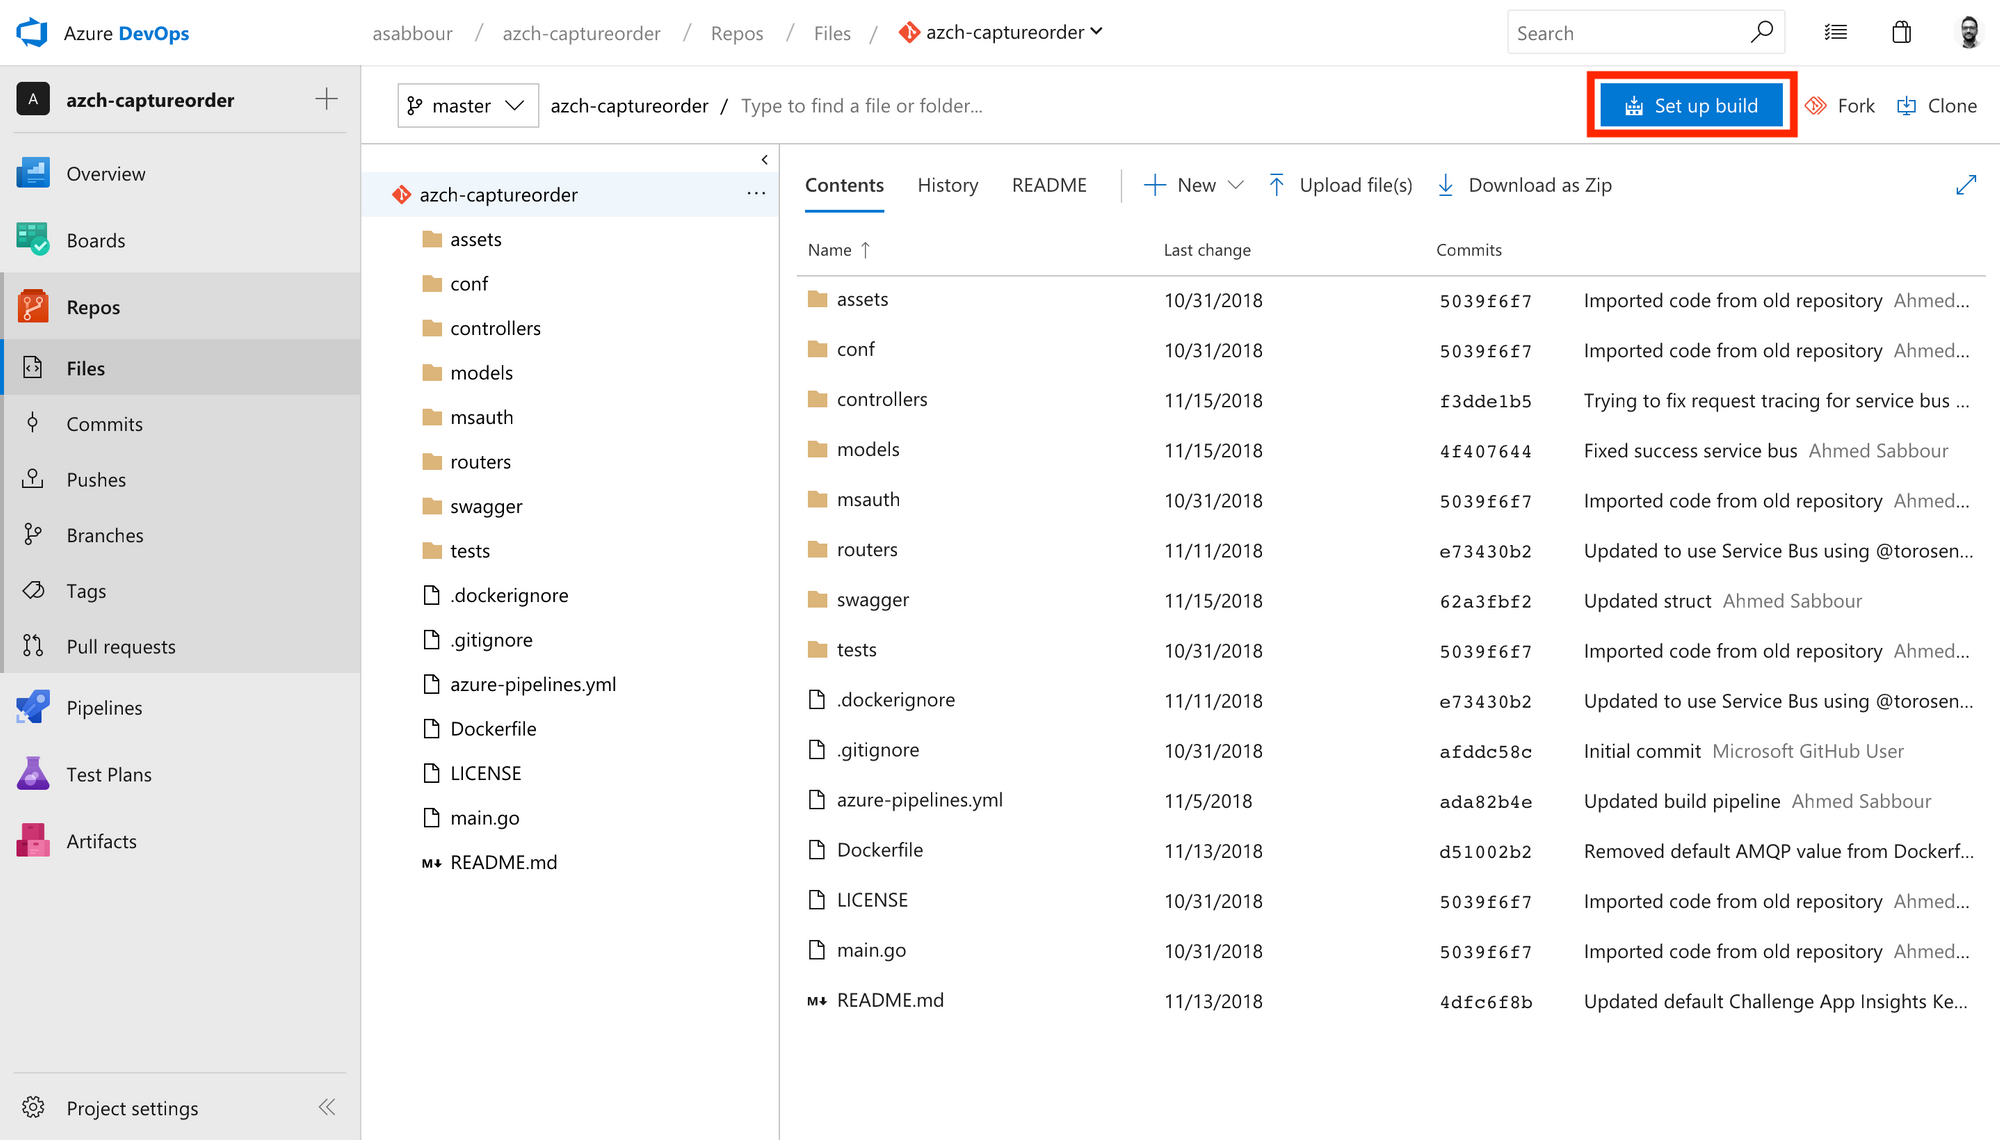
From your code repository, click Set up build.
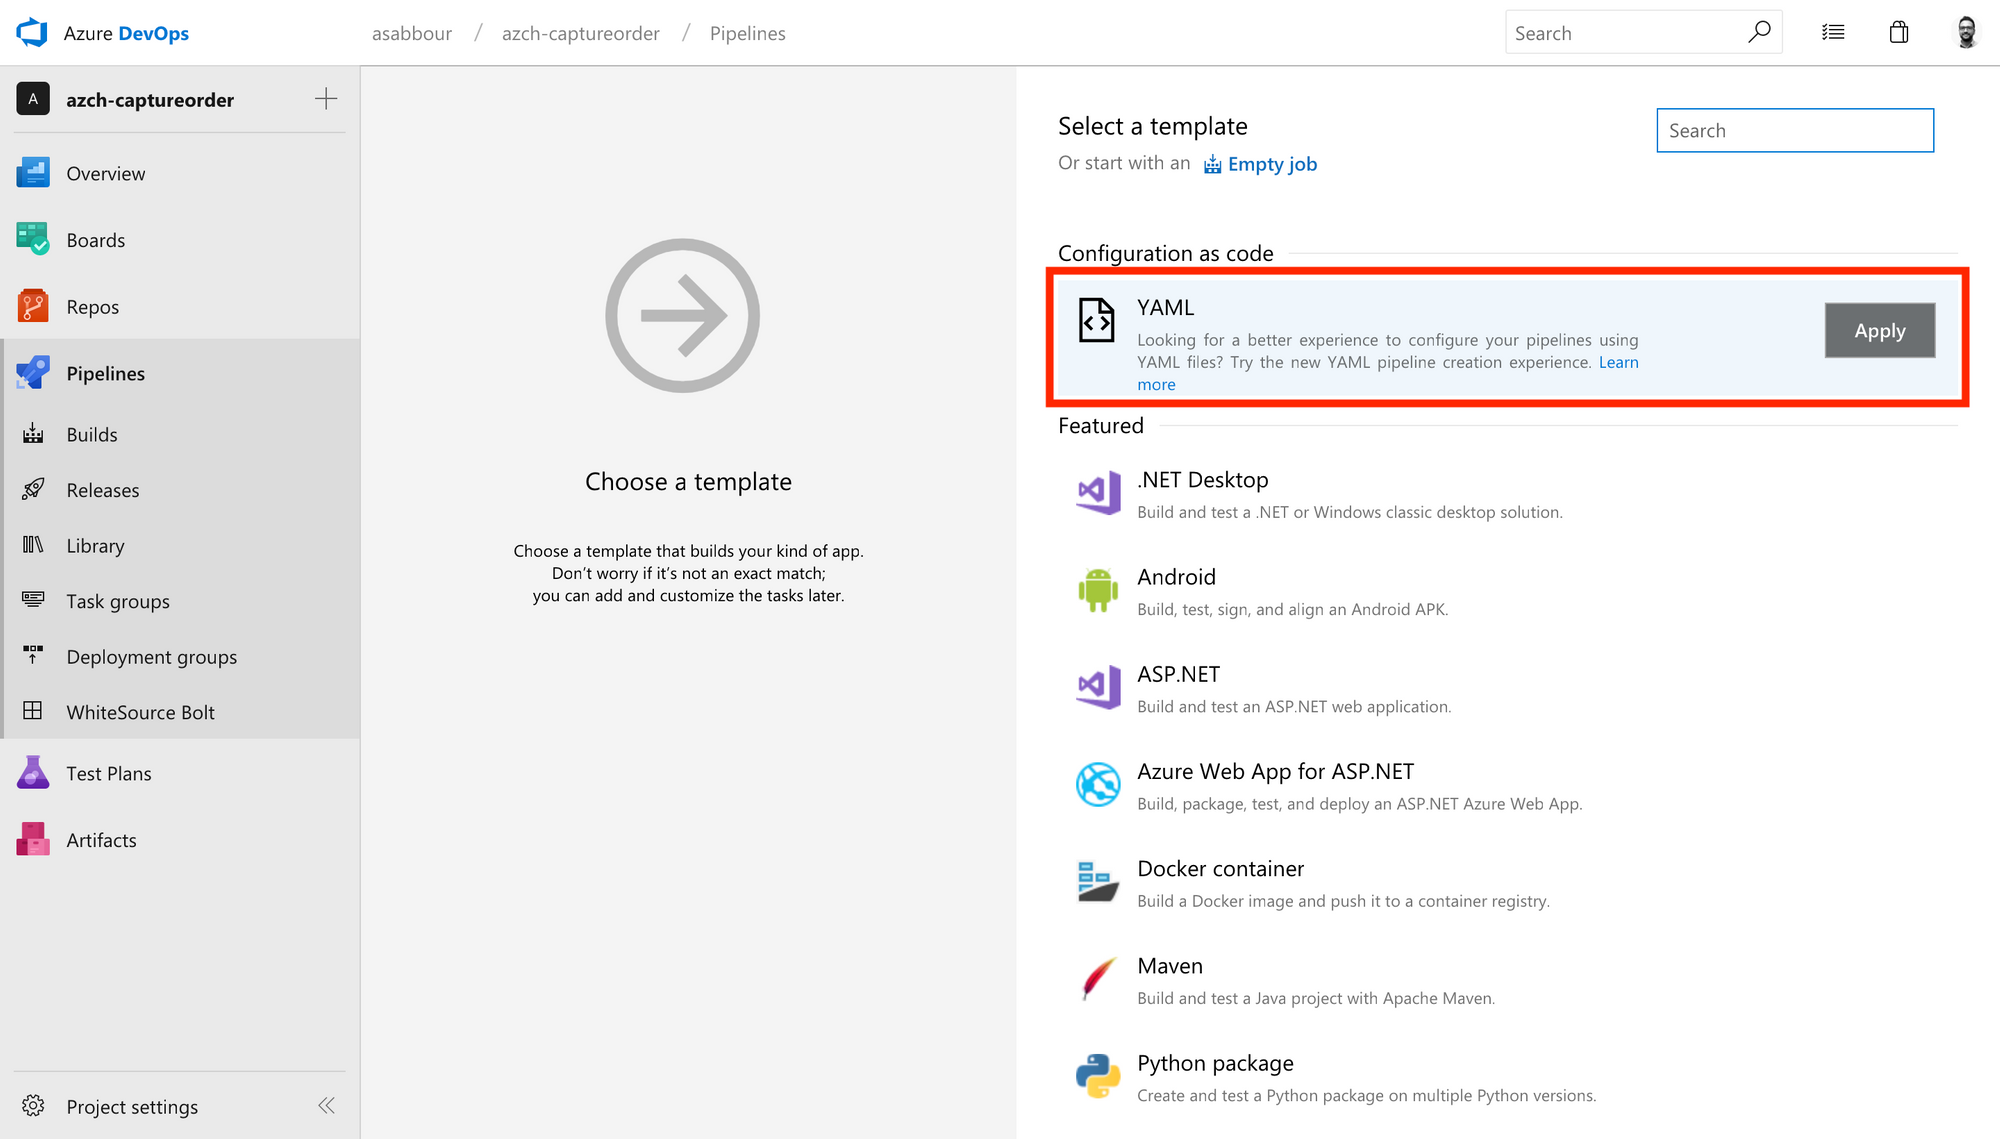
Select the YAML from Configuration as code.
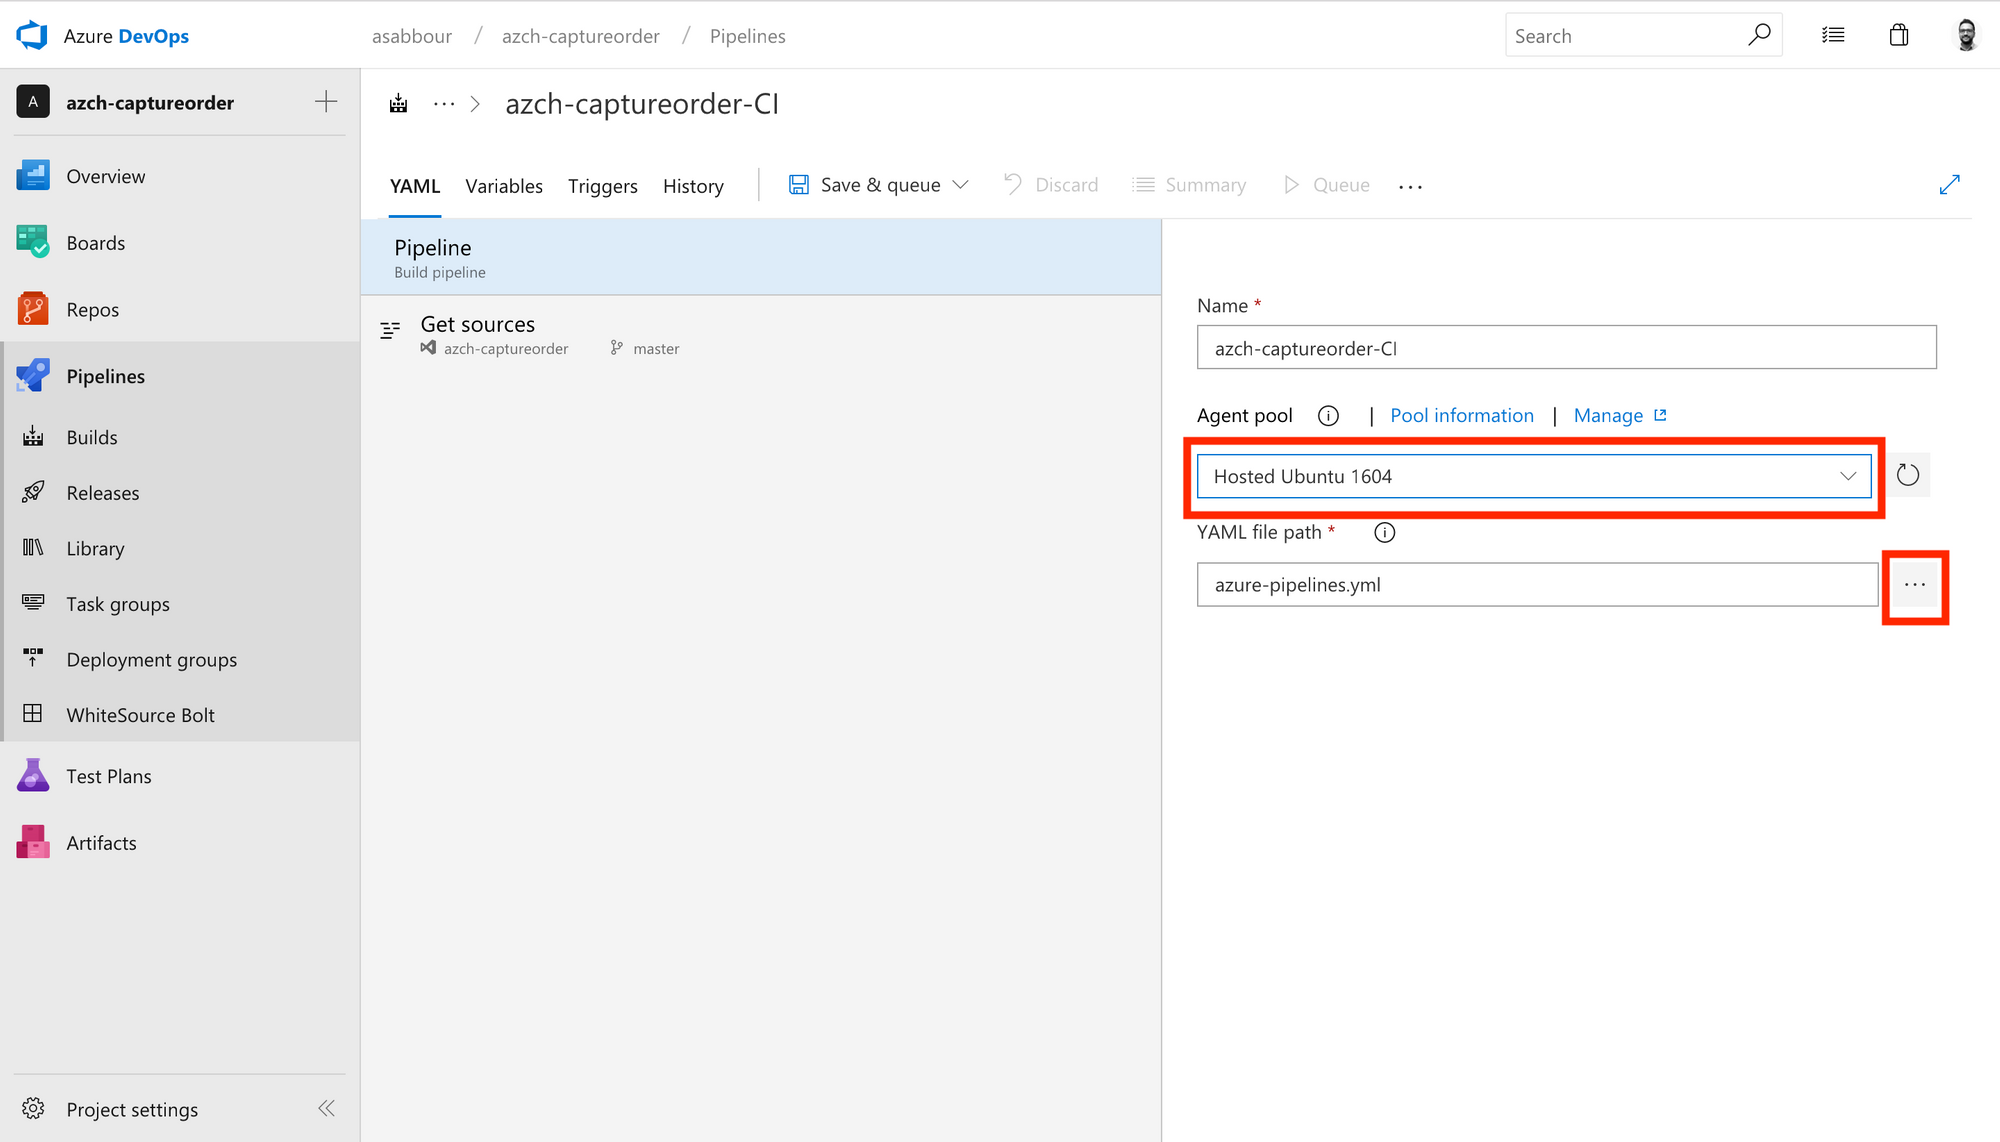
Browse to and select the azure-pipelines.yml file in your repository. You should also change the agent to be Hosted Ubuntu 16.04.
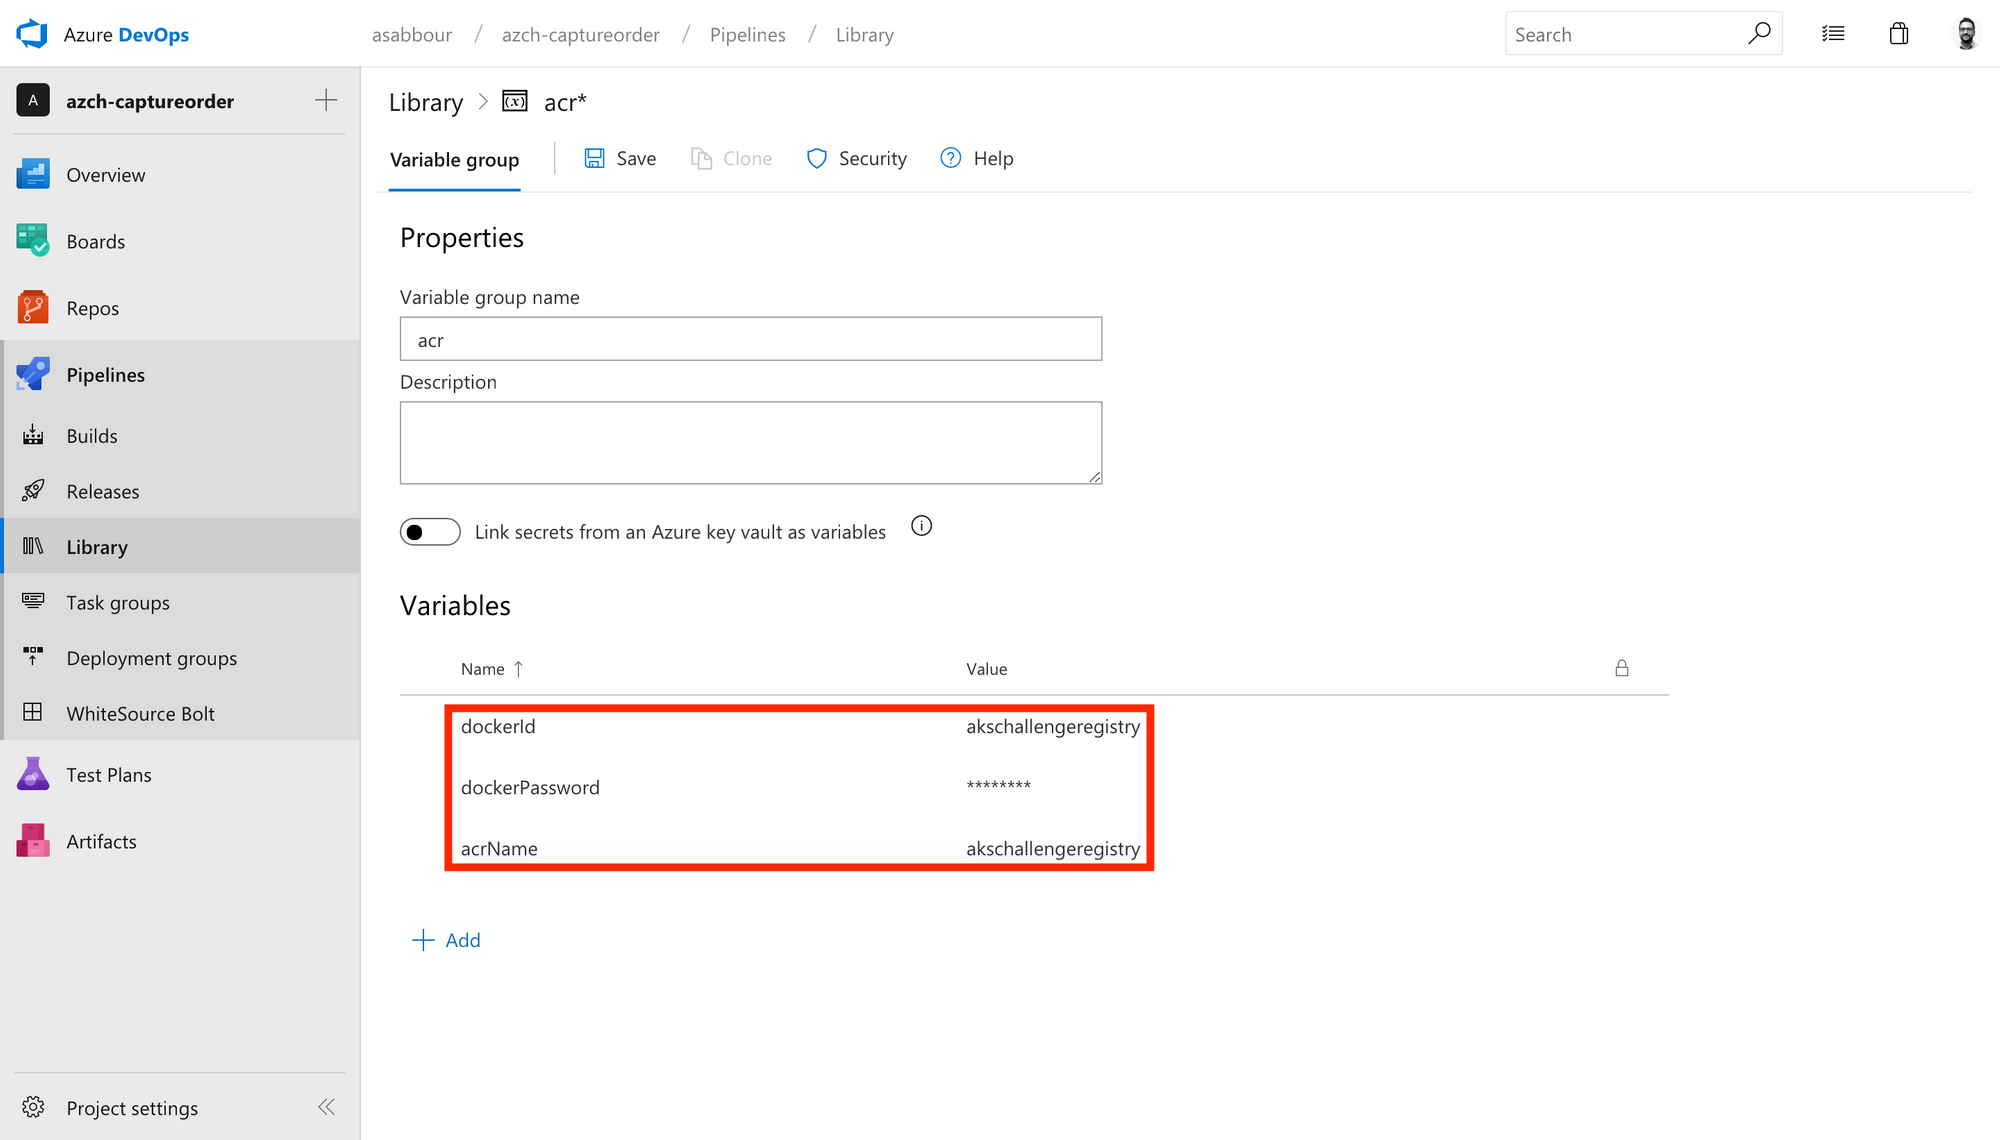
Notice the variables like $(Build.BuildId), $(acrName), $(dockerId) and $(dockerPassword).
The first one is a pre-defined build variable that will map to the current generated build ID, essentially allowing you to have a unique ID per build that we append to the image name that gets pushed to Azure Container Registry.
The other 3 variables will need to be defined in the pipeline UI.
dockerId: The admin user name/Service Principal ID for the Azure Container Registry.acrName: The Azure Container Registry name.dockerPassword: The admin password/Service Principal password for Azure Container Registry.
Refer to https://docs.microsoft.com/en-us/azure/container-registry/container-registry-auth-aks#access-with-kubernetes-secret to obtain the Service Principal ID/Service Principal Password or enable the Azure Container Registry admin user.
Run the build pipeline and verify that it works.
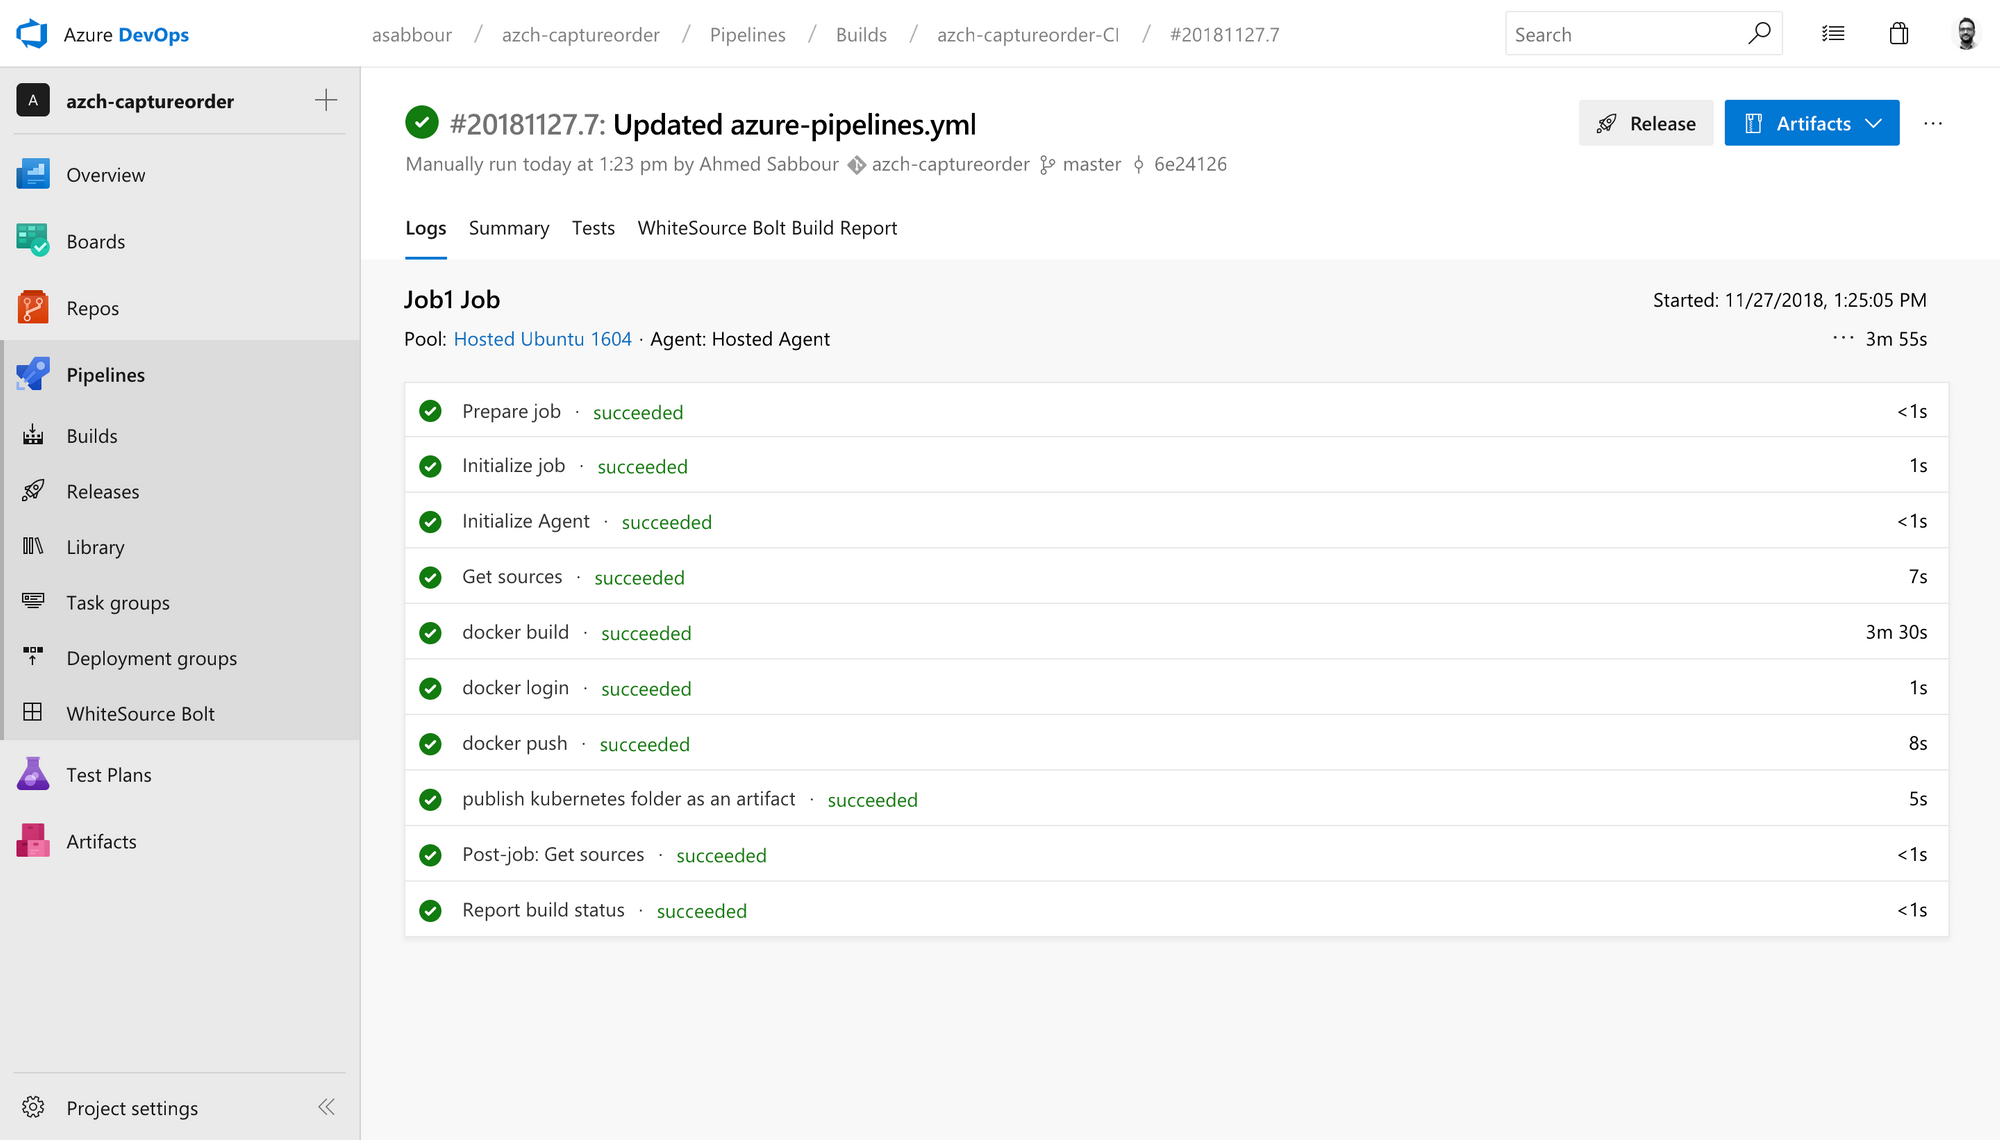
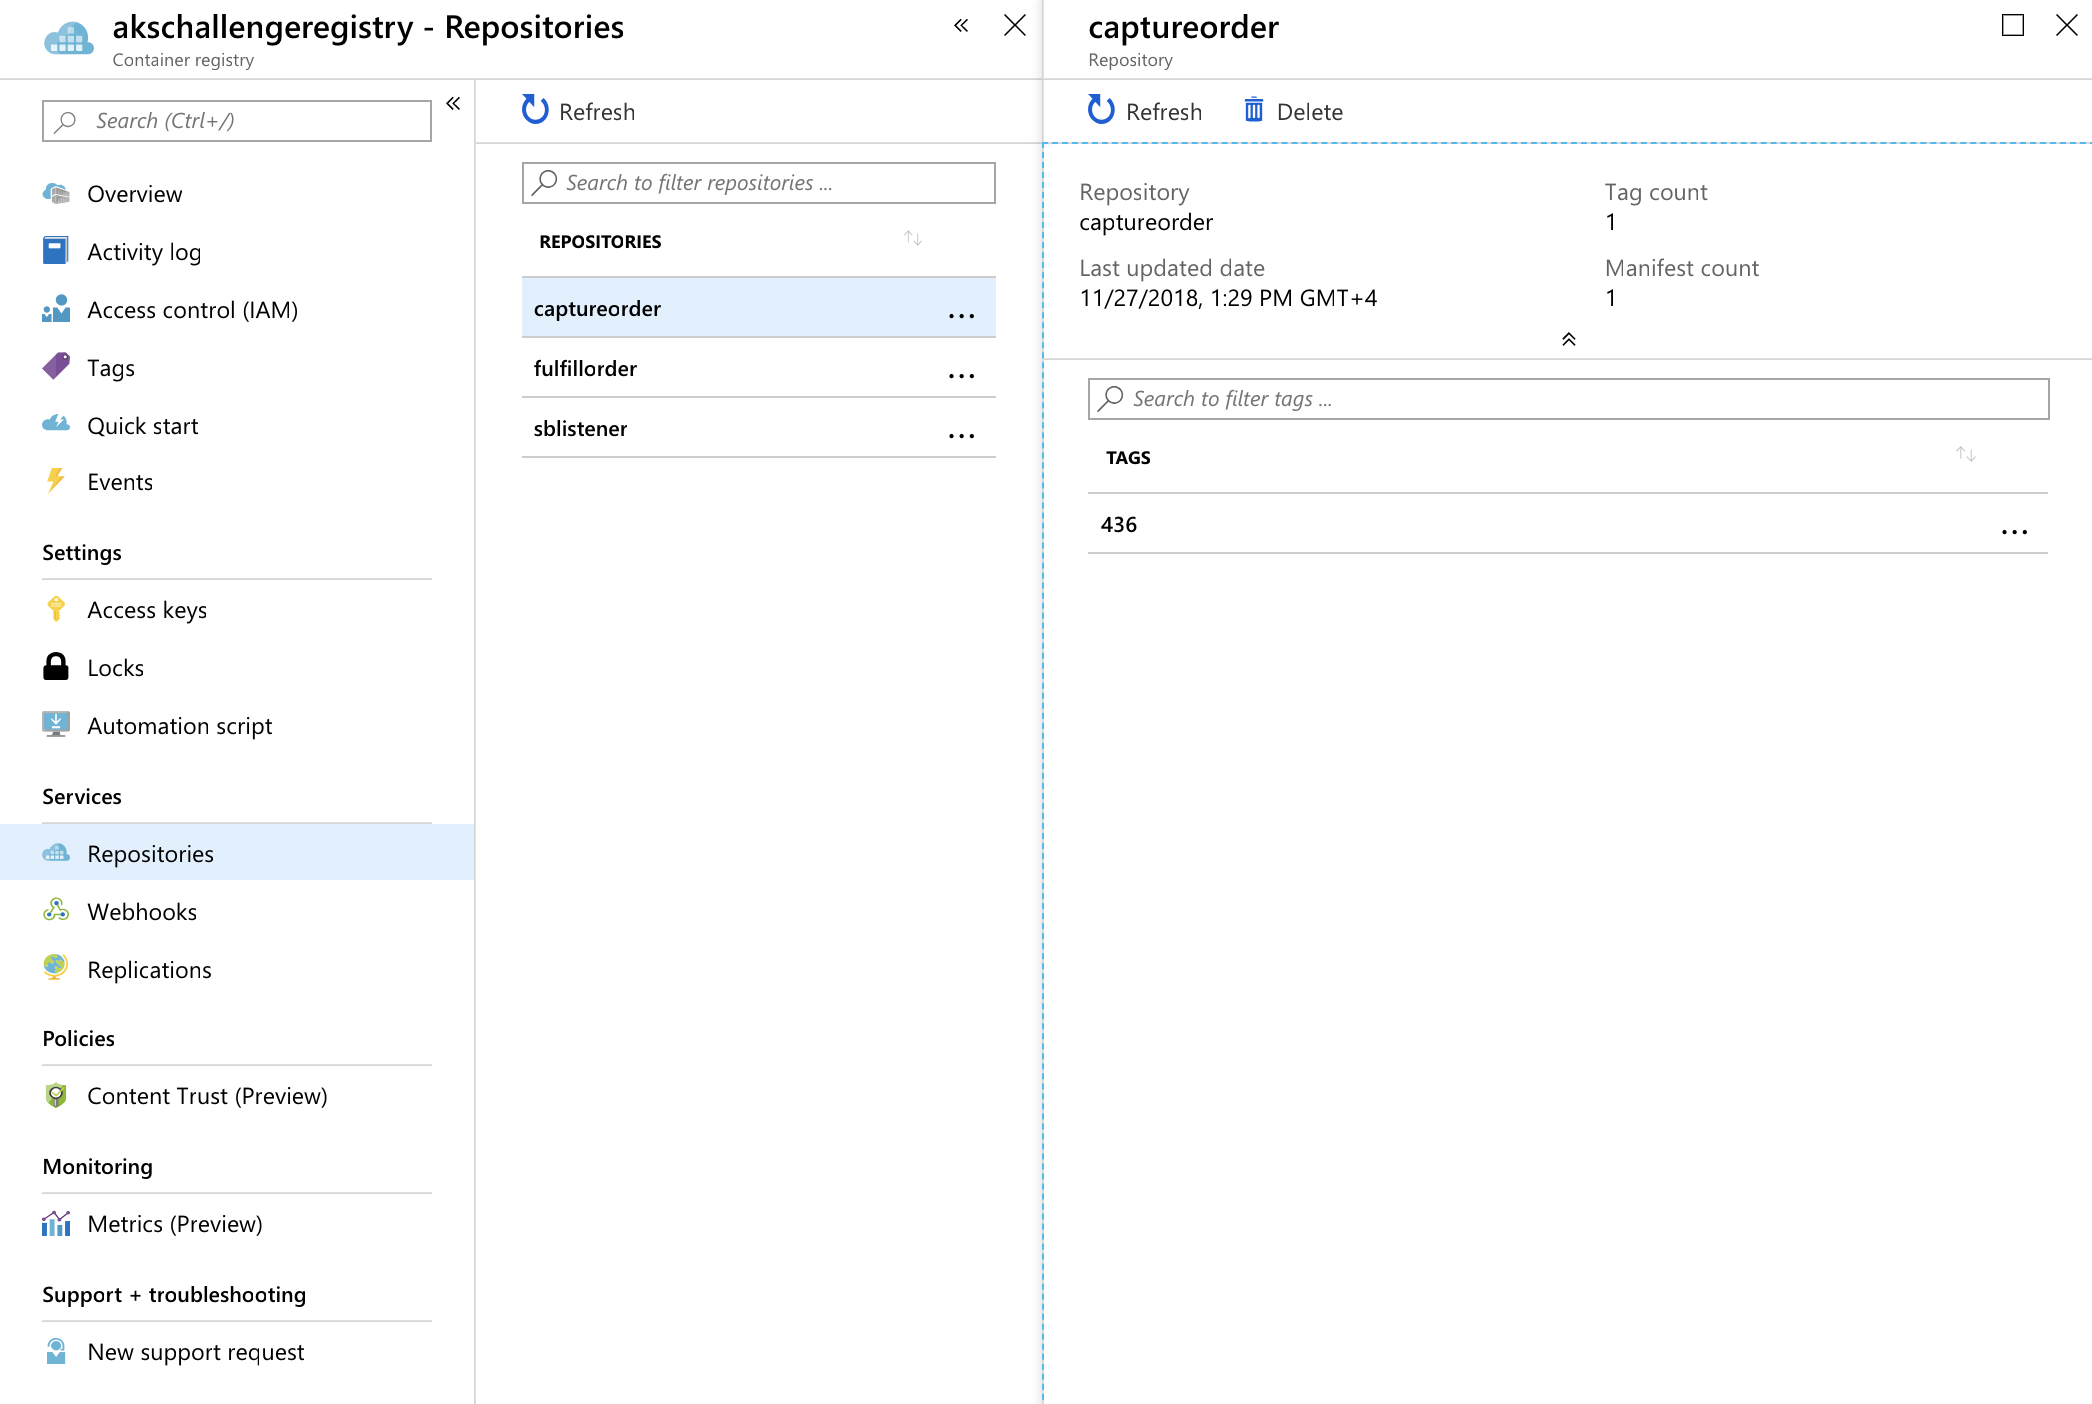
Confirm that the image ends up in your Azure Container Registry.
Config build pipeline
As mentioned earlier, I chose to store YAML config data in its own repository. For simplicity's sake, I'll start with one big monolith YAML file called kubernetes.yaml stored in the yaml directory. In a later post, I'll break this down into a Helm chart.
The kubernetes.yaml content looks like the below. The interesting part is the ##BUILD_ID## placeholder in the file. This placeholder will get replaced in the deployment pipeline with the actual image build ID that triggered the deployment.
apiVersion: apps/v1
kind: Deployment
metadata:
  name: captureorder
spec:
  selector:
    matchLabels:
      app: captureorder
  template:
    metadata:
      labels:
        app: captureorder
    spec:
      containers:
      - name: captureorder
        image: akschallengeregistry.azurecr.io/captureorder:##BUILD_ID##
        ports:
        - containerPort: 80
---
apiVersion: v1
kind: Service
metadata:
  name: captureorder
spec:
  selector:
    app: captureorder
  ports:
  - protocol: TCP
    port: 80
    targetPort: 8080
  type: LoadBalancer
Similar to the code pipeline, I also have a azure-pipelines.yml file defining the build pipeline for the config repository. The steps here are really simple, just publish the yaml folder which includes the kubernetes.yaml file as a built artifact.
pool:
  vmImage: 'Ubuntu 16.04'

steps:
- task: PublishBuildArtifacts@1
  displayName: 'publish yaml folder as an artifact'
  inputs:
    artifactName: 'yaml'
    pathToPublish: 'yaml'
Deployment pipeline
Create a continuous deployment pipeline that triggers upon either new container images or new YAML configuration artifacts to deploy the changes to your cluster.
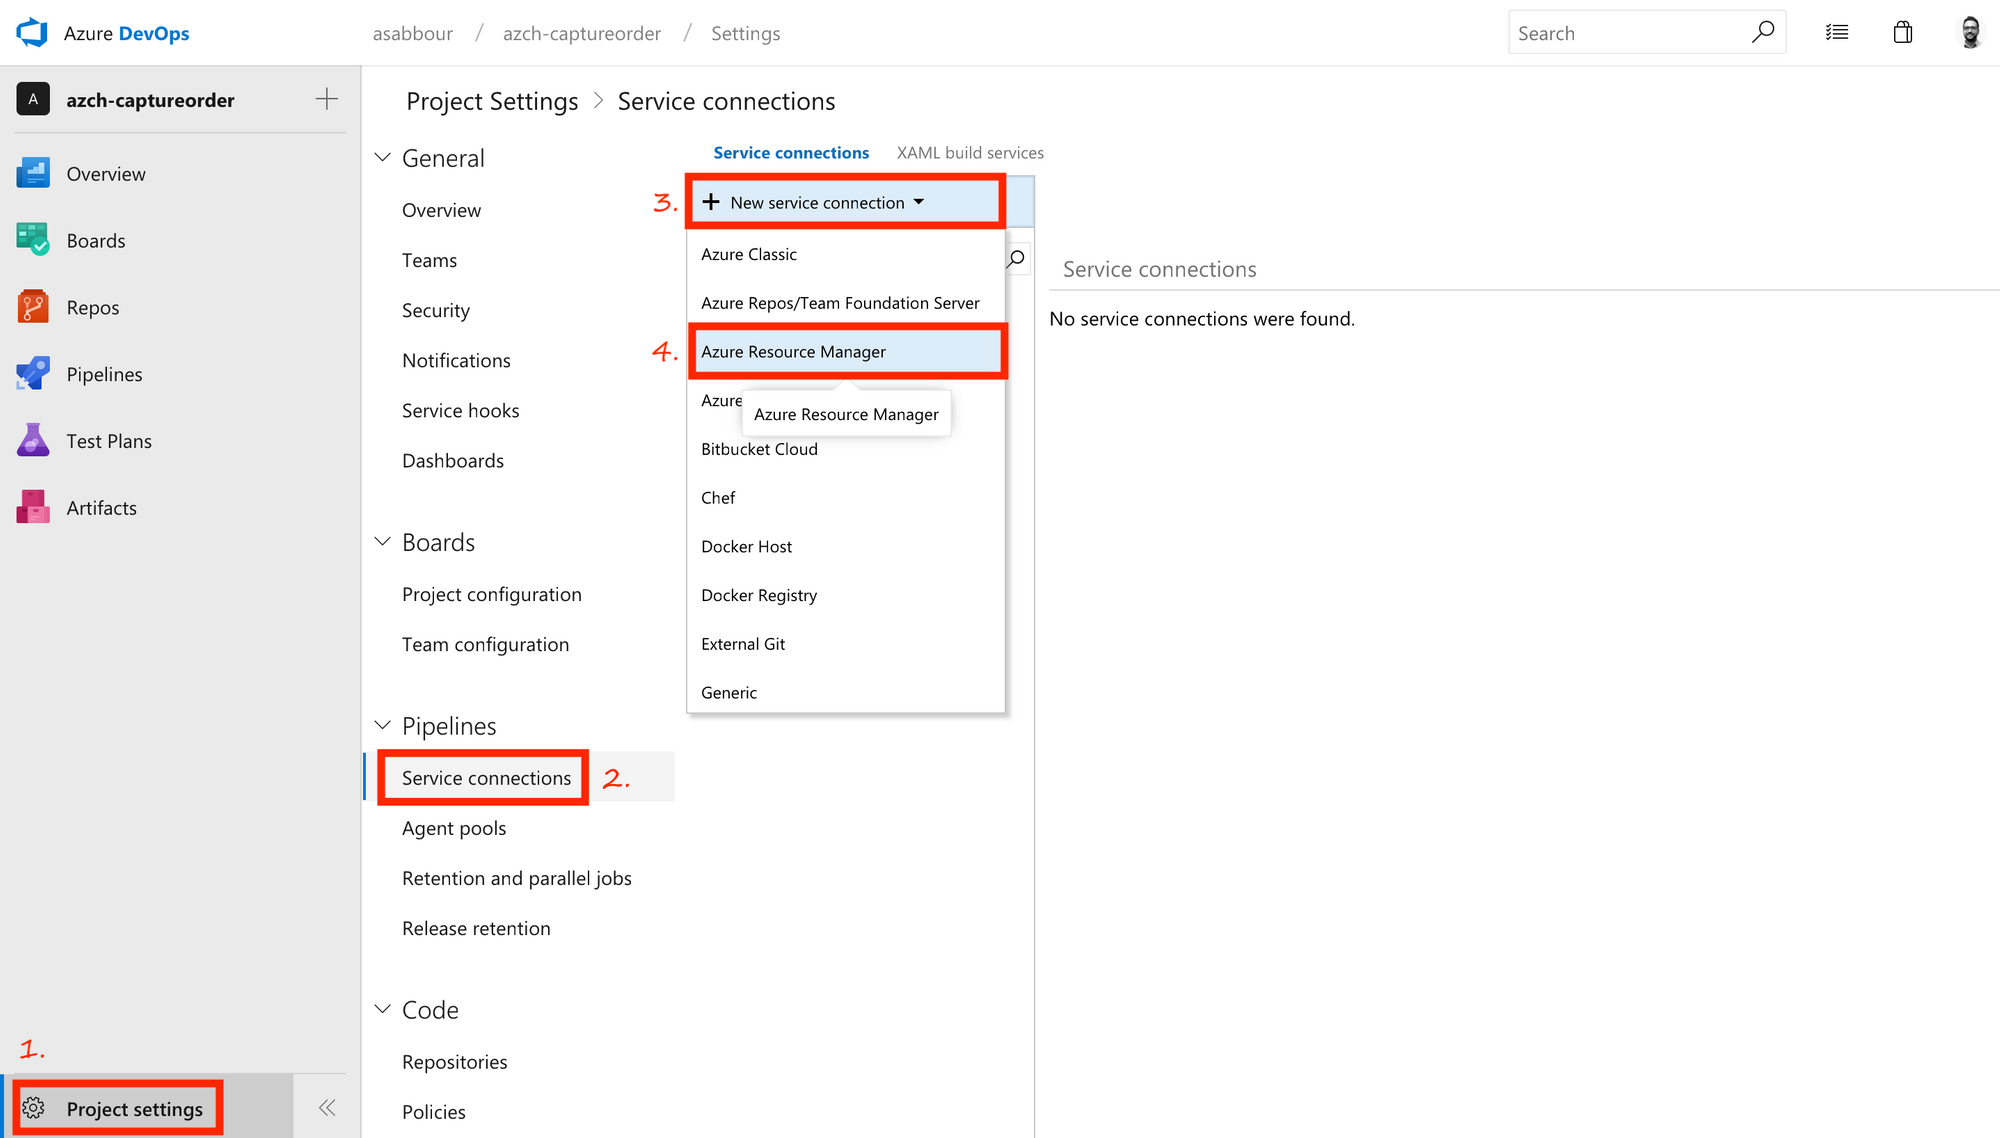
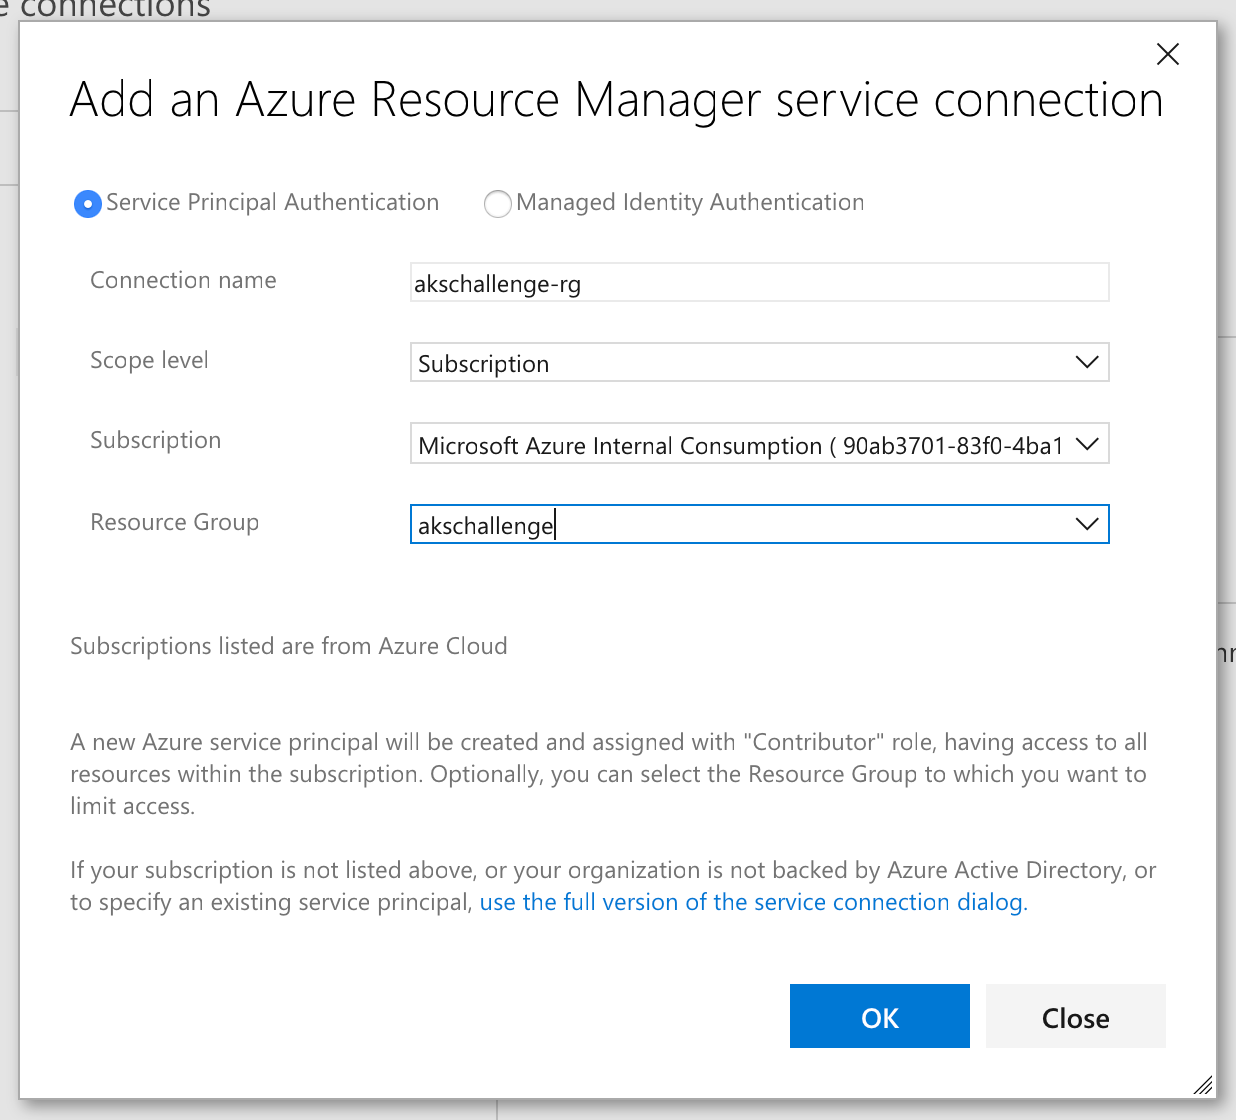
Configure a Service Connection so that Azure DevOps can access resources in your Azure Resource Group for deployment and configuration purposes.
Pick the Azure Resource Group you're using.
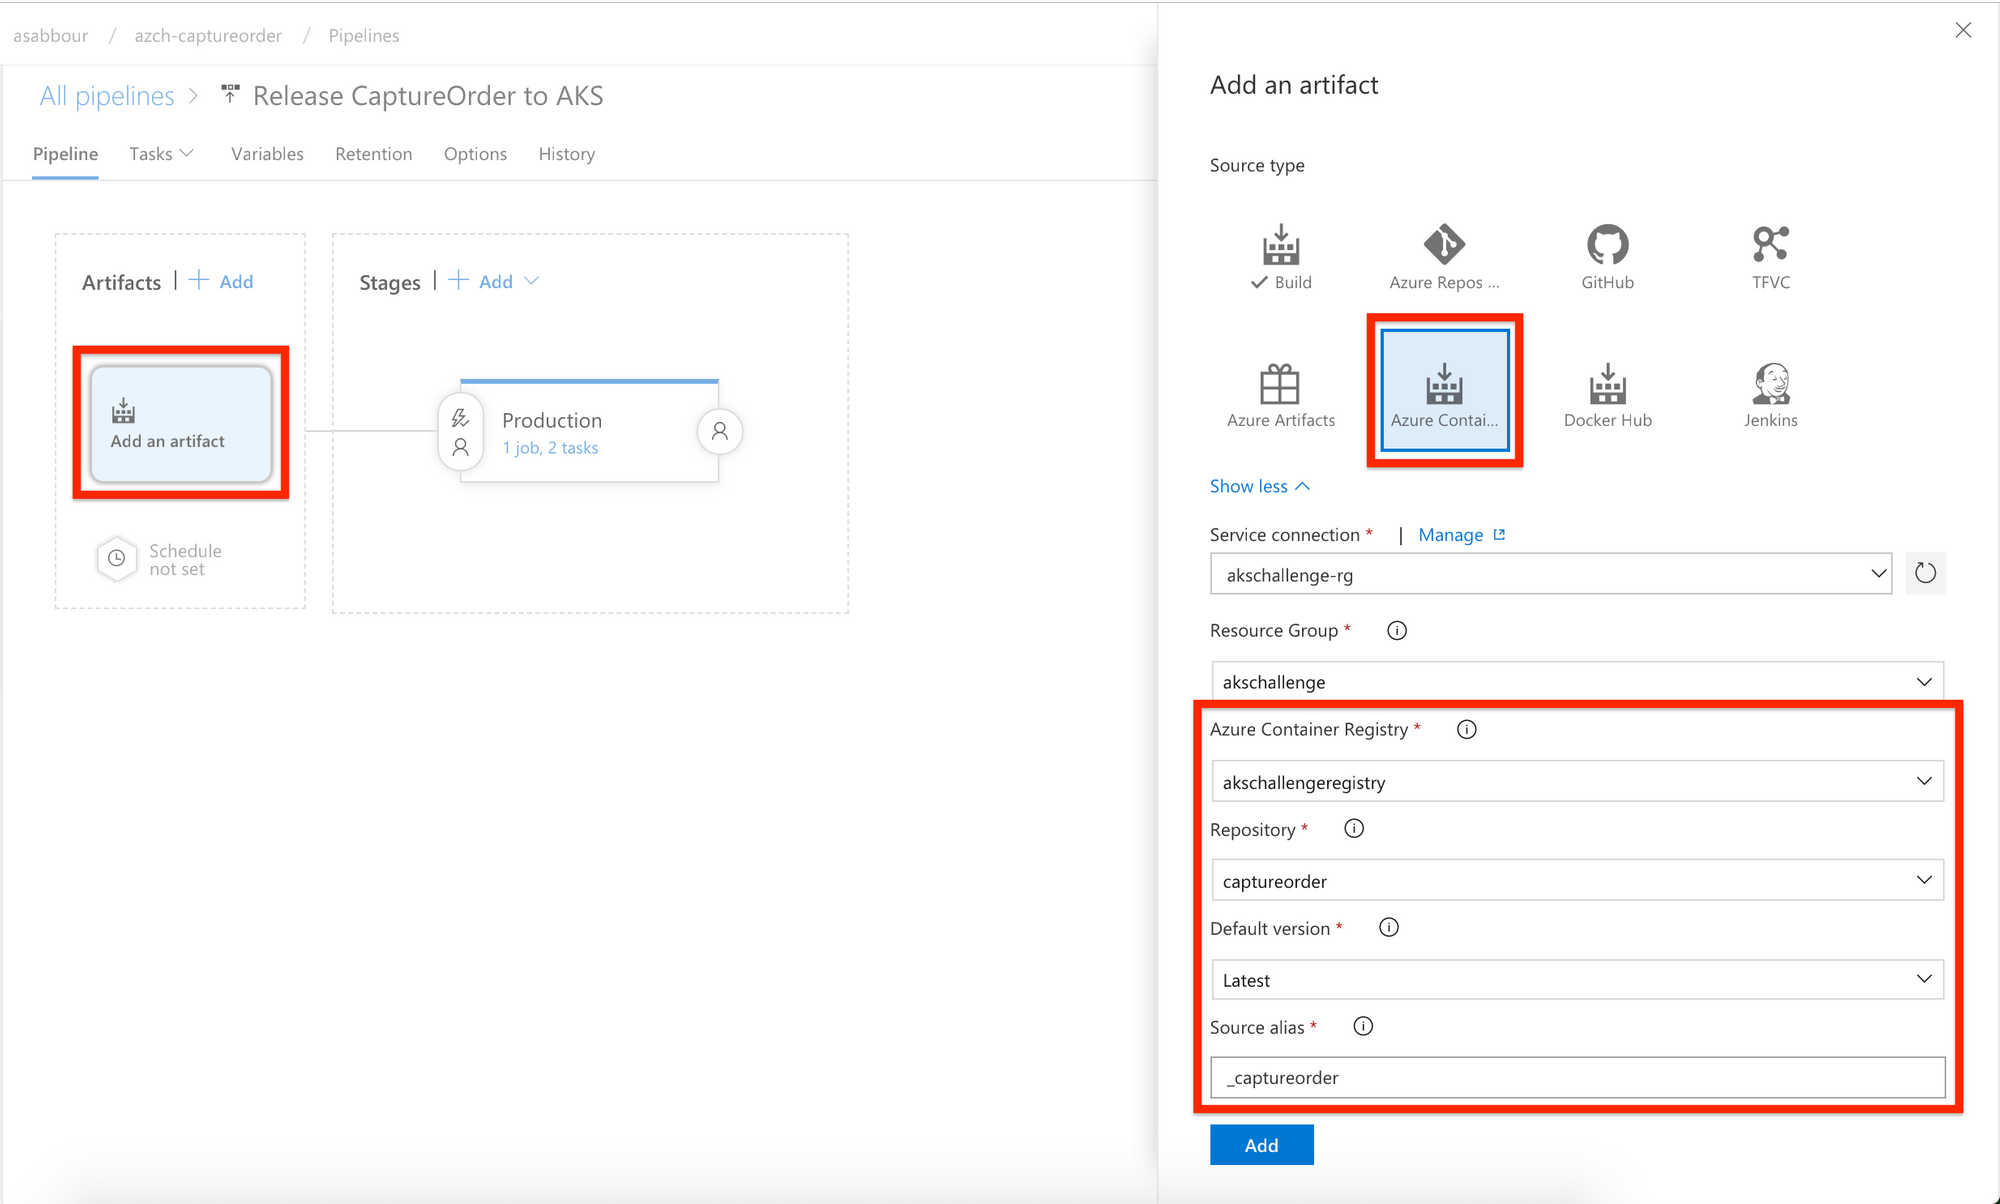
Create a Release Pipeline, start with an Empty template. Add an Azure Container Registry artifact as a trigger and enable the continuous deployment trigger.
Make sure to configure it to point to the Azure Container Registry repository where the build pipeline is pushing the captureorder image.
This means that for every image that gets pushed into Azure Container Registry that match the repository configuration, the release pipeline will get triggered and it will have in its release variables the actual image tag that triggered the release.
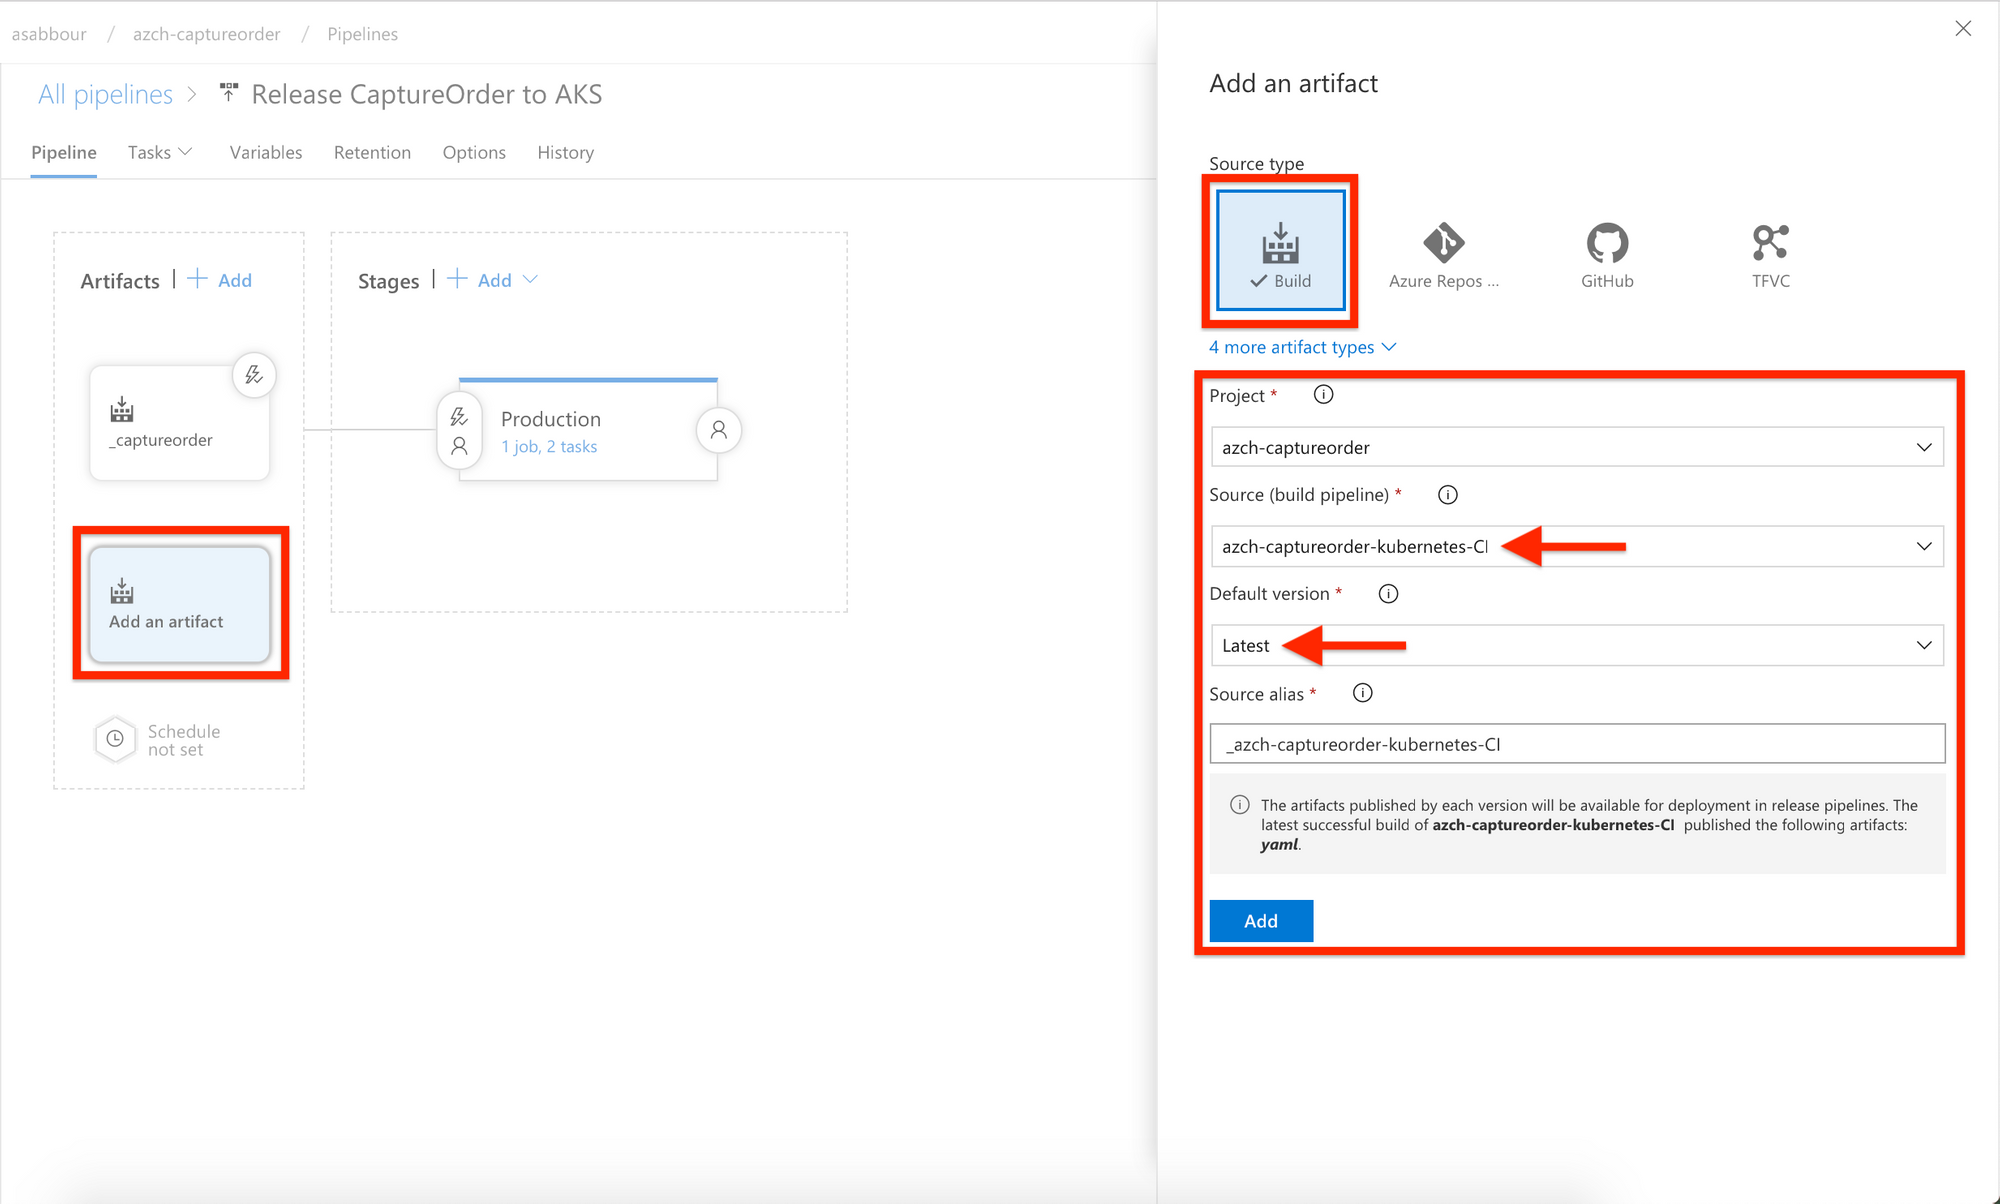
Add another Build artifact coming from the configuration build pipeline as a trigger and enable the continuous deployment trigger. This is the trigger for changes in the YAML configuration.
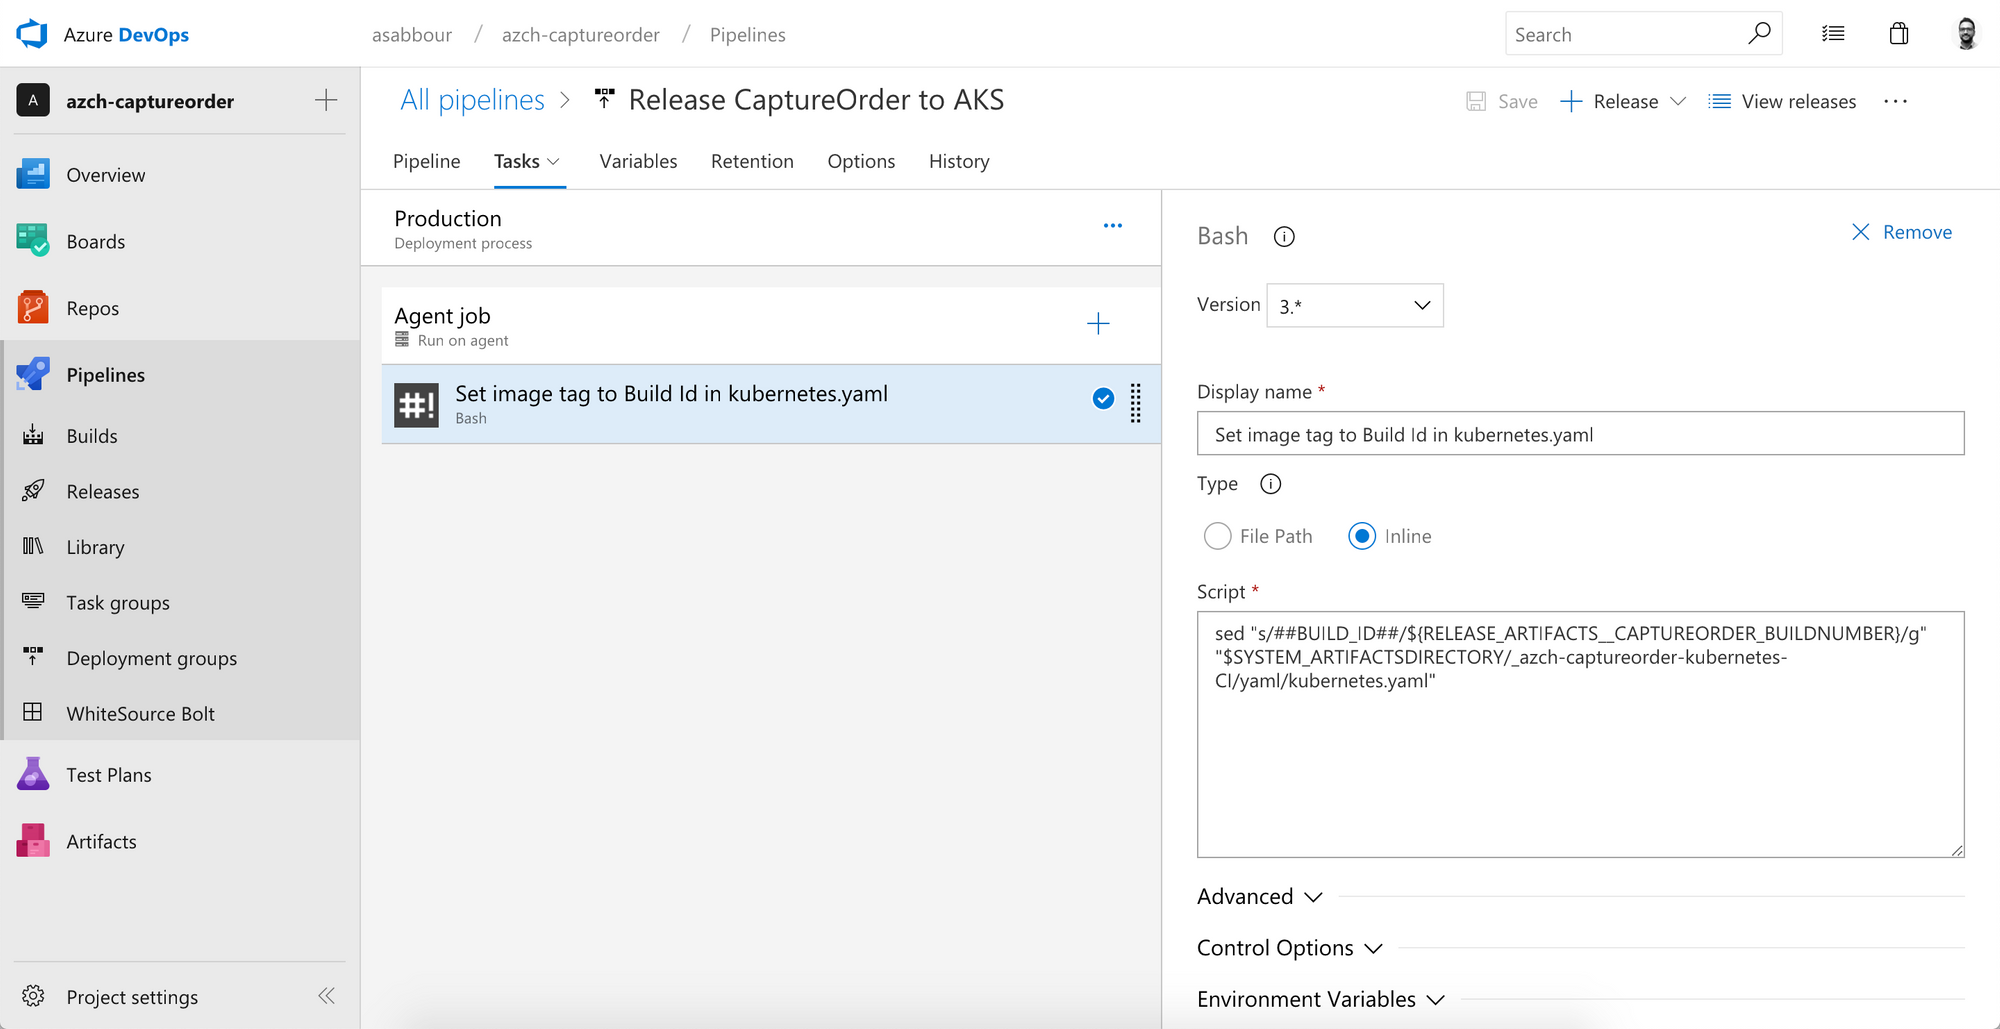
Now, start adding tasks to the default stage. Make sure the agent pool is Hosted Ubuntu 16.04 then add an inline Bash Script task that will do a token replacement to replace ##BUILD_ID## in the kubernetes.yaml file coming from the artifact with the actual build being released. Remember that kubernetes.yaml was published as a build artifact.
You'll want to get the Docker container tag incoming from the Azure Container Registry trigger to replace the ##BUILD_ID## token.
If you named that artifact _captureorder, the build number will be in an environment variable called RELEASE_ARTIFACTS__CAPTUREORDER_BUILDNUMBER. Similarly for the other artifact _azch-captureorder-kubernetes, its build ID would be stored in RELEASE_ARTIFACTS__AZCH-CAPTUREORDER-KUBERNETES-CI_BUILDID.
You can use the following inline script that uses the sed tool.
sed -i "s/##BUILD_ID##/${RELEASE_ARTIFACTS__CAPTUREORDER_BUILDNUMBER}/g" "$SYSTEM_ARTIFACTSDIRECTORY/_azch-captureorder-kubernetes-CI/yaml/kubernetes.yaml"
Add a Deploy to Kubernetes task, switch to the latest version (1.0 at the time of writing). Configure access to your AKS cluster using the service connection created earlier.
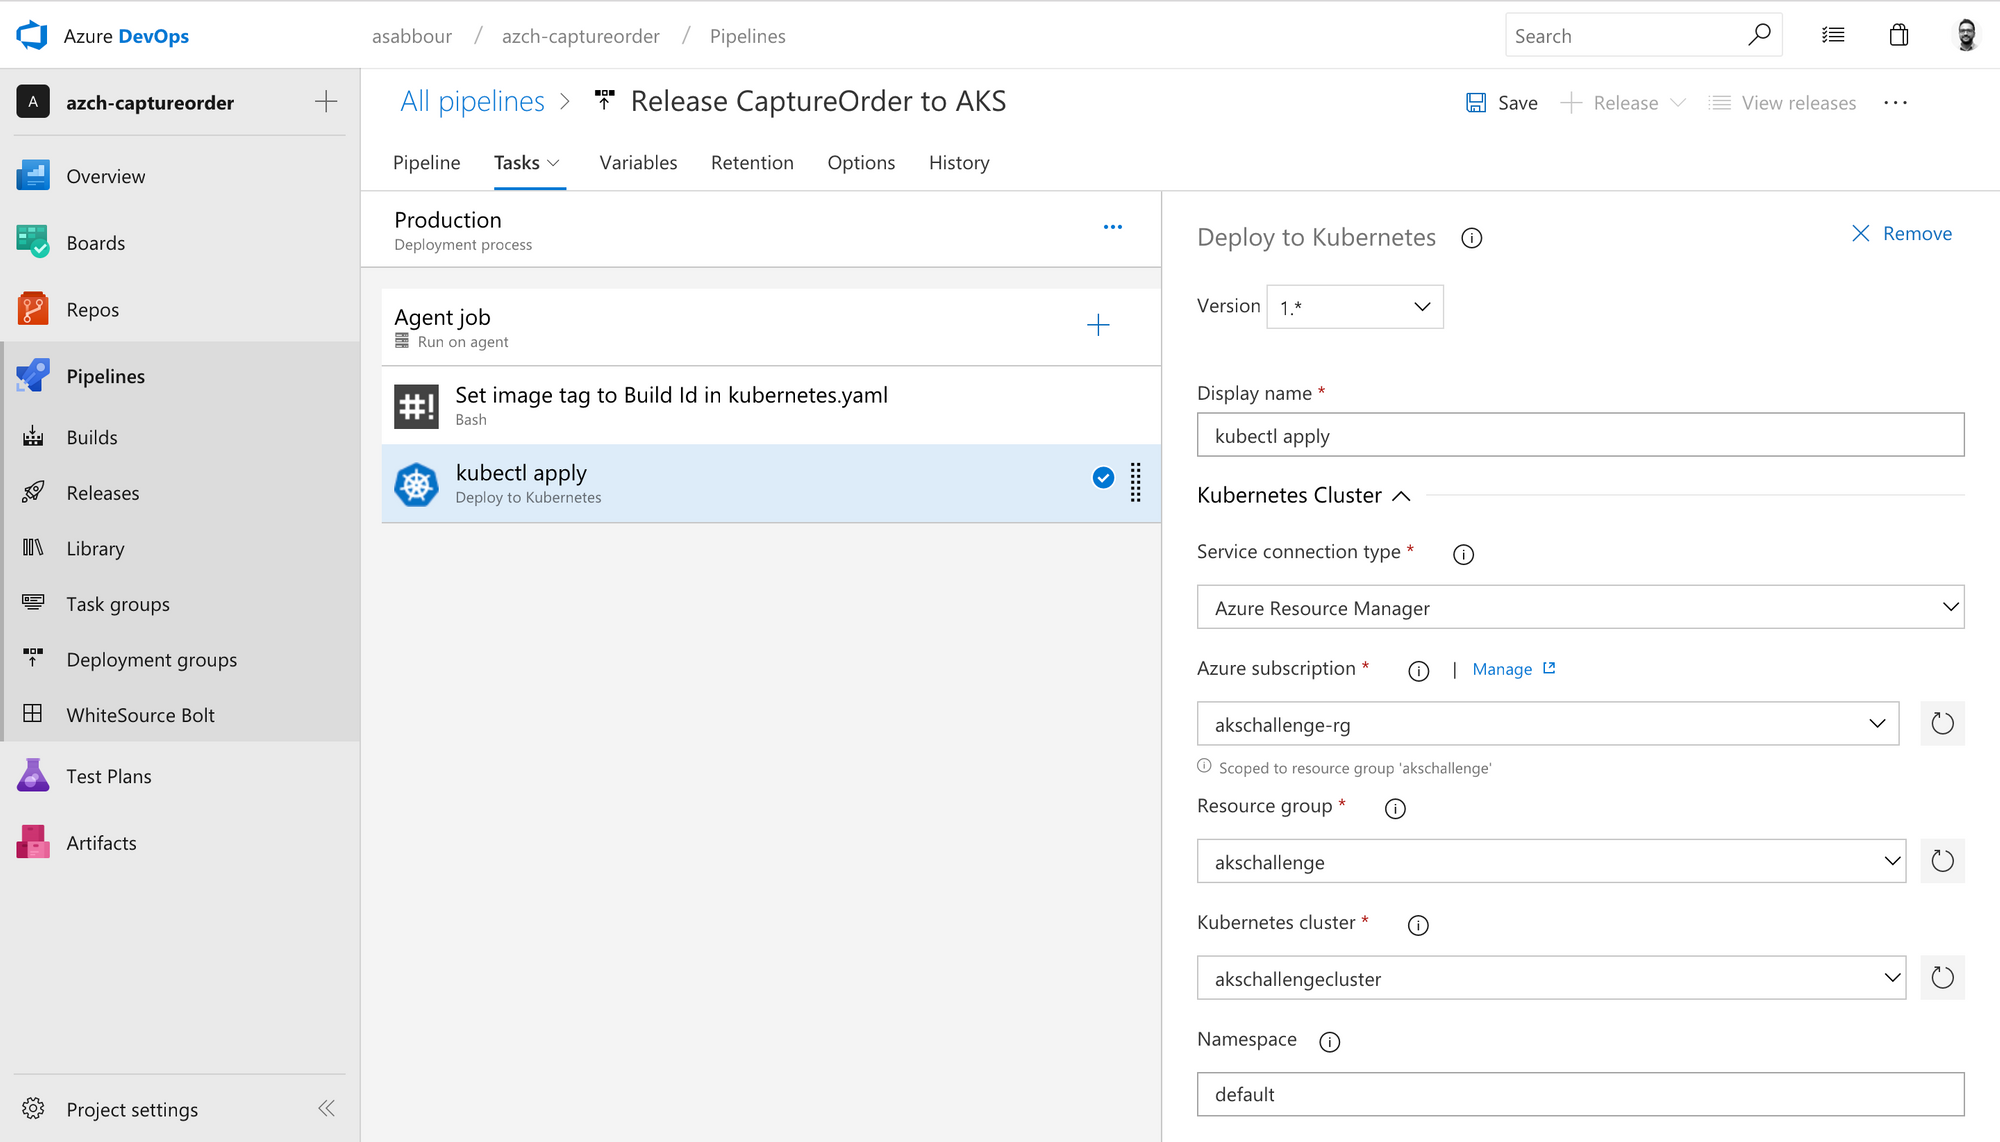
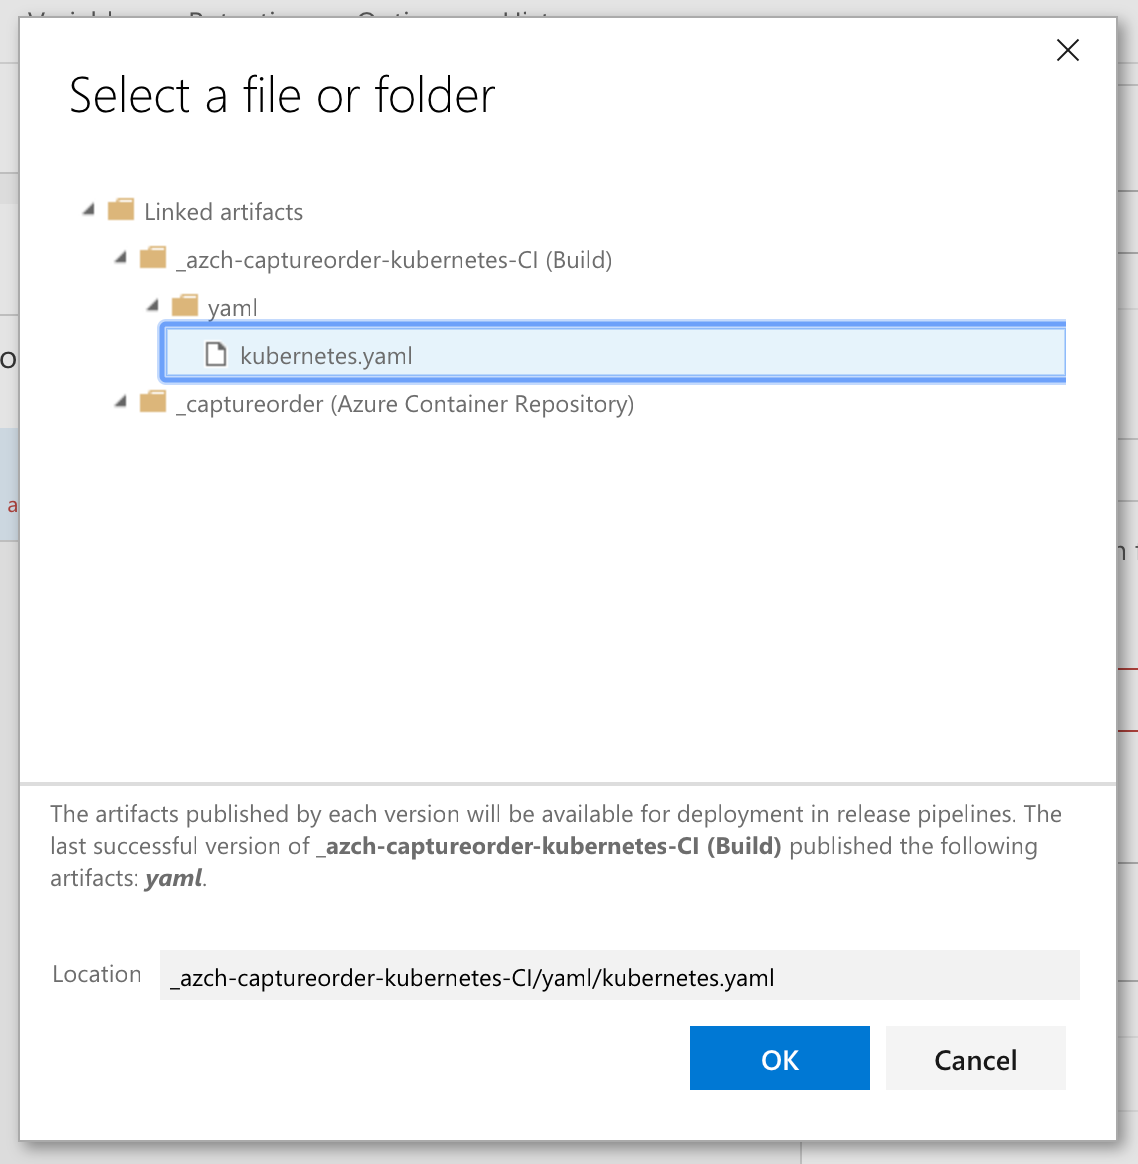
Scroll down and check Use configuration files and use the following value $(System.DefaultWorkingDirectory)/_azch-captureorder-kubernetes-CI/yaml/kubernetes.yaml or select it from the browse button. You are essentially picking the kubernetes.yaml file from the build artifact.
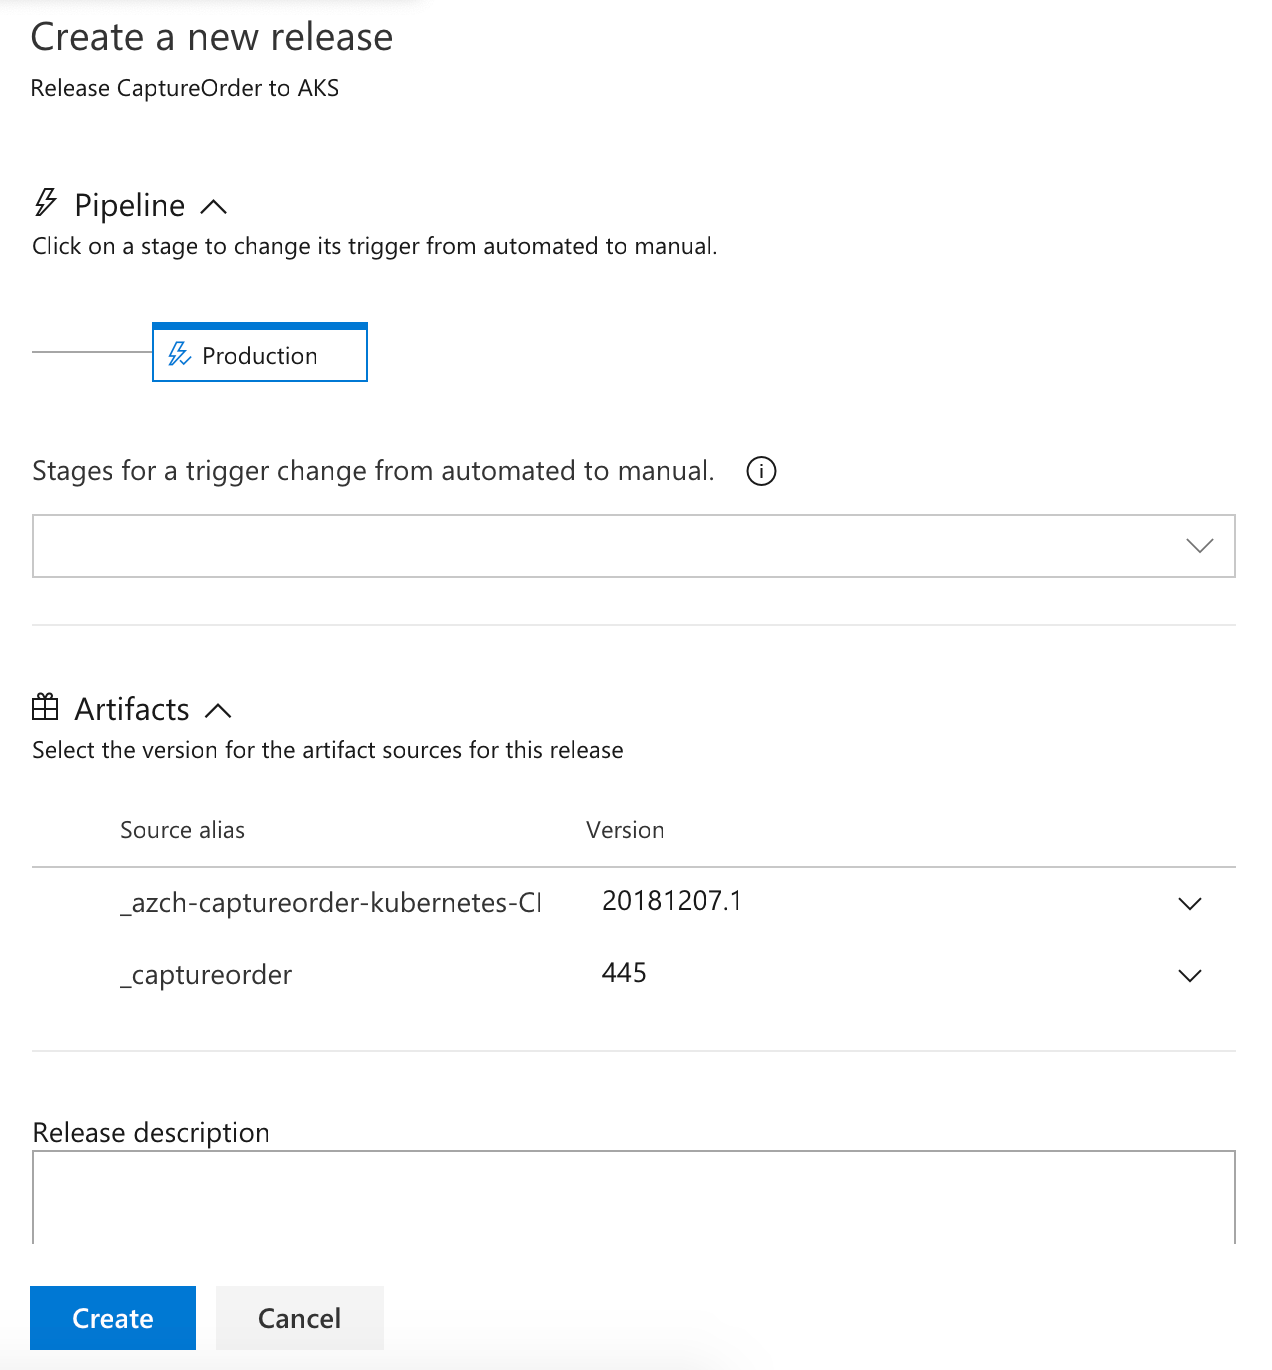
Create a manual release and pick the latest build as the source. Verify the release runs and that the captureorder service is deployed.
Make a change to the application source code, commit the change and watch the pipelines build and release the new version. Make a change to the configuration (for example, change the number of replicas), commit the change and watch the pipelines update your configuration.
Closing
I hope you found this useful. It certainly isn't the only way to create a CI/CD pipeline for Kubernetes, but it is a way that I found really convenient and flexible. In a future post, I'll replace the YAML config with a Helm chart.