Introduction
I've been in this situation many times, I have an API that needs an authenticated user to access it, how can this problem be solved?
You could pass the username and password of the user with each request, a horribly unsecure method for that the password can be sniffed if your API is not using HTTPS, and even if using HTTPS, it is not a good practice to keep sending this sensitive data around.
Come to save you is the Token based authentication. You login to a server, and you a presented with a Token, which you can think of as a Ticket with an expiry date. Whenever you want to access protected resources, you just present this ticket to the service, and the service would check its validity and grant you access.
That's the idea behind Token based authentication, which OAuth and Simple Web Token (SWT) is one of them.
I will not be going into deep details in this post, but I'll be providing the sample working solution. The project and the Simple Web Token OAuth library are posted on GitHub, so get them from there.
It is based on the project hosted below but modified.
http://zamd.net/2011/02/08/using-simple-web-token-swt-with-wif/
http://netfx.codeplex.com/
What we are trying to build
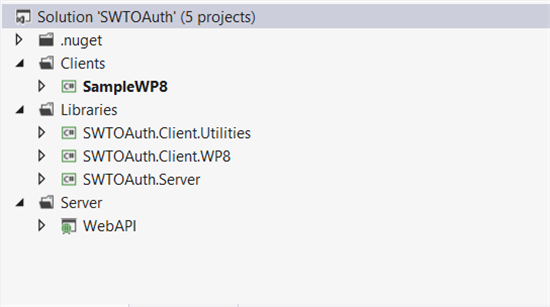
Open the sample solution, you should find the solution structure as below 
Server side: Configuring and Protecting the Web API
In this part, we are going to configure the Windows Azure Access Control Service (ACS) to accept logins from Facebook, and allow your client application to use it to Authenticate and issue Simple Web Tokens. Then protect the Web API itself with such mechanism.
Step 1
Create a Windows Azure ACS by going to the Management Portal. Windows Azure ACS allows you to externalize the process of authenticating users, where you can use it to authenticate users using Facebook, Google, Microsoft Account and Active Directory. ACS is a big topic and if you are interested, I suggest you read up on it here.
Create a new Access Control namespace
Step 2
After creating the ACS on Windows Azure, you need to create a "Relying Party Application". This basically allows you to specify applications that have access to your API.
Click on Manage to manage the ACS
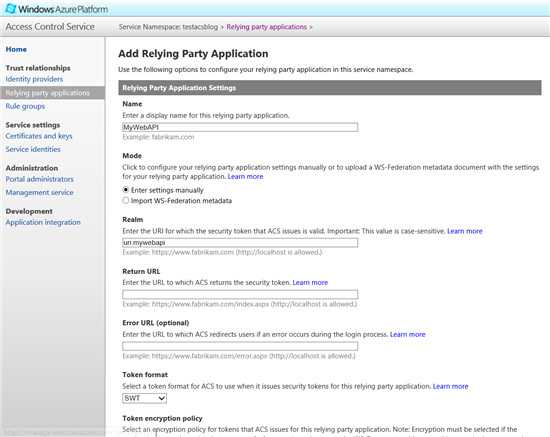
When the management portal loads up, click on "Relying party applications", then click on Add.
- · Enter a name for the application, say "MyWebAPI"
- · Enter a realm to identify the app, could be a url or an identifier, Ex: "uri:mywebapi"
- · Select the "SWT" Token Format
- · Select the identity providers you want to enable login through. For the purpose of this, we're sticking with Windows Live Id, but you can add more through the Identity Providers tab.
- · Click Generate to generate a 256-bit symmetric signing key
- · Save

Now take the Symmetric Key and the realm and put them in the Web.config of your Web API under the <appSettings>.
<!-- for ACS -->
<appSettings>
<add key="TrustedTokenPolicyKey" value="[your symmetric key]" />
<add key="TrustedAudience" value="[your app realm]" />
</appSettings>
And then open the Global.asax.cs file to register the SWTOAuth module to handle incoming requests and validate the tokens that the client is sending. Write the line below in Application_Start() method:
GlobalConfiguration.Configuration.MessageHandlers.Add(new TokenValidationHandler(CloudConfigurationManager.GetSetting("TrustedTokenPolicyKey")));
This will allow the SWTOAuth library to validate the tokens that the client is sending.
Step 3
But what does the SWTOAuth module do exactly? It parses the incoming Authorization header in the request, validates the validity of the token, then sets the current User.Identity of the Thread to the parsed claims from the SWT token in the request. By making that, you are able to make use of the User.Identity in any of the API Controllers like so:
// GET api/claims
public Dictionary<string, string> Get()
{
// Get the User.Identity which would have been set by the SWTOAuth module
var identity = User.Identity as ClaimsIdentity;
// Parse the incoming claims
Dictionary<string, string> parsedClaims = new Dictionary<string, string>();
foreach (var claim in identity.Claims)
parsedClaims[claim.Type] = claim.Value;
// Return them, just for show
return parsedClaims;
}
Stay tuned for the next post, were we'll tackle the client side of the app.
Note: This post originally appeared on my MSDN blog at http://blogs.msdn.com/b/africaapps/archive/2013/04/04/part-1-protecting-an-asp-net-web-api-hosted-on-azure-with-oauth-simple-web-tokens-using-the-access-control-service-server-side.aspx


